Embroidery

Blanket and Buttonhole Stitch

Downloadable and printable PDF instructions.

Essentially the same thing, the only difference between the two stitches is the spacing between them.   They are listed in the table below, in the order is which they appear in the video clip at the bottom of the tuition page, with the starting time for each stitch in the right-hand column. 

Blanket Stitch9 seconds
Buttonhole Stitch59 seconds

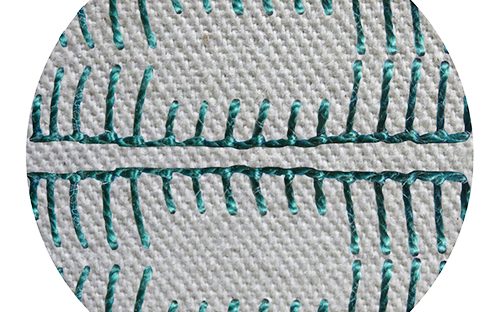
In the video clip on this page, the small samples were worked with perle no. 5 thread on 2 parallel and horizontal straight lines.   If you wish to experiment with the stitch before you work it onto your project, work on similar lines with similar thread.

  • With a heat erasable pen, draw 2 horizontal parallel lines placing them about 10 mm apart.

Working the stitch:

Work between the lines, starting on the bottom line and pulling towards yourself.  The purl (or ridge) of the stitches will form on the bottom line.

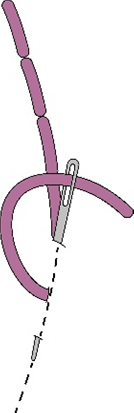
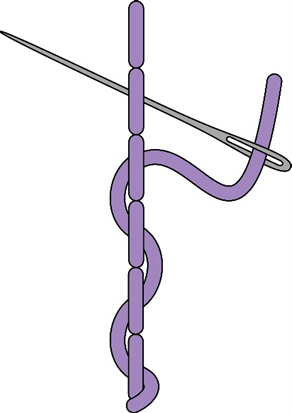
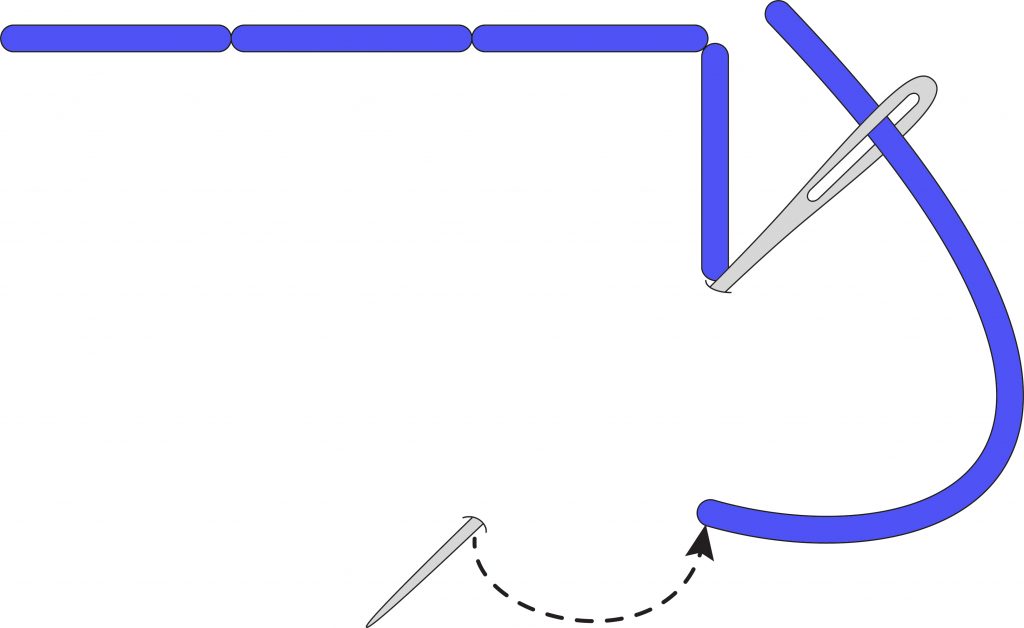
A single buttonhole or blanket stitch looks like a reversed capital L. 

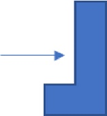
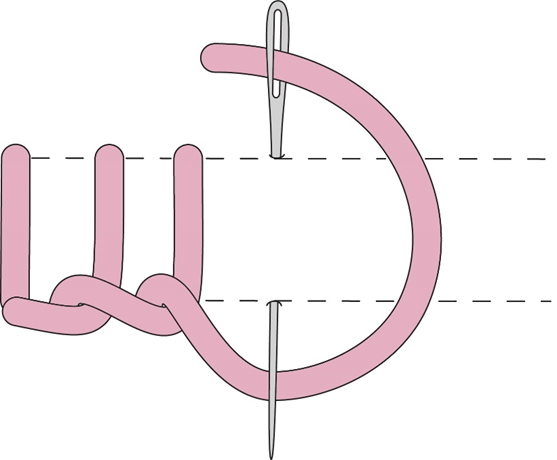
This doesn’t matter if you are working a circle because you will work around the circle until you get back to where you started.  If you are working a straighter line, it means that if you go straight into working the first stitch, you will have a missing leg, as indicated by the arrow in the illustration above. So, the trick is to fill in the leg before it is missing by starting with a straight stitch.

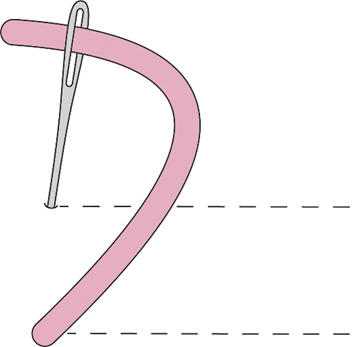
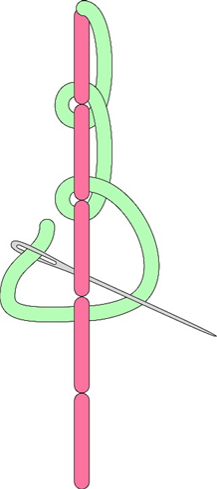
  • Working from left to right, bring the needle up on the bottom line, where you require the purl. 
  • Take the needle in on the top line to create a straight stitch.
  • Bring the needle up on the bottom line, coming out of the same hole that you came out of when you started the straight stitch.
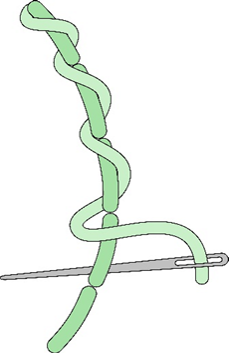
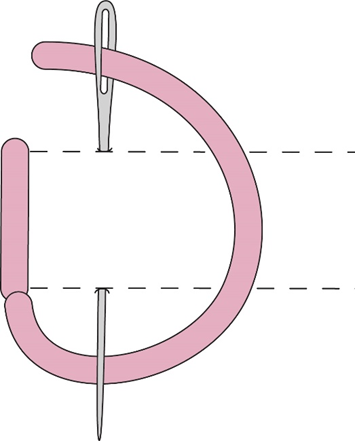
  • Leaving a space, go in on the top line, and without pulling through, come out again on the bottom line, directly below where you went in on the top line, with the thread looped under the needle. 
  • Pull through. 

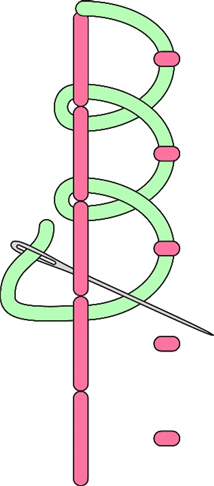
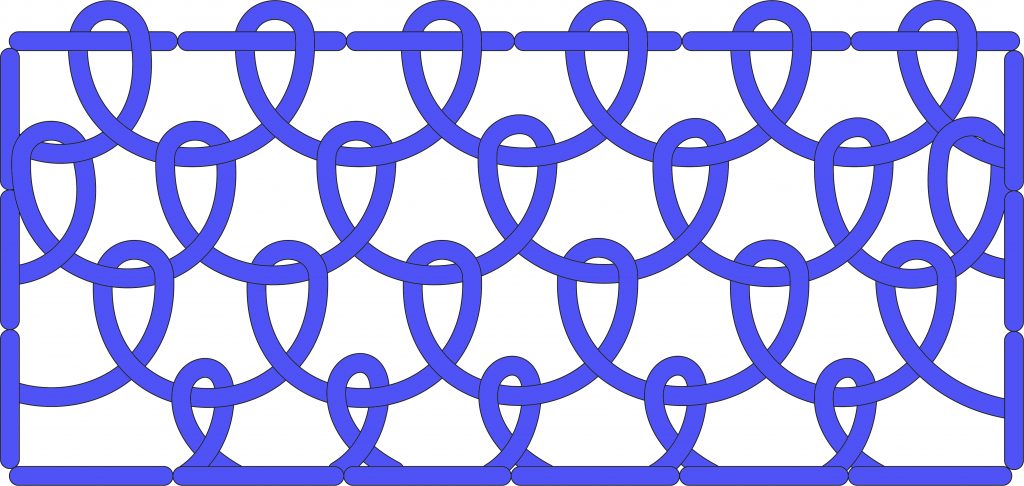
If you are working Blanket Stitch, leave a gap when you go in at the top edge and again at the bottom edge when you come up to catch the loop and pull through to finish the stitch.

If you are working Buttonhole Stitch leave only enough space to form the stitch without pushing the existing stitches out of place.  Whilst not quite as close, your spacing is similar to satin stitch so that the finished product looks like satin stitch with a purl on the one edge.

  • Continue adding stitches in this way making sure that, if you are creating blanket stitch, the gaps that you leave between the stitches are even.
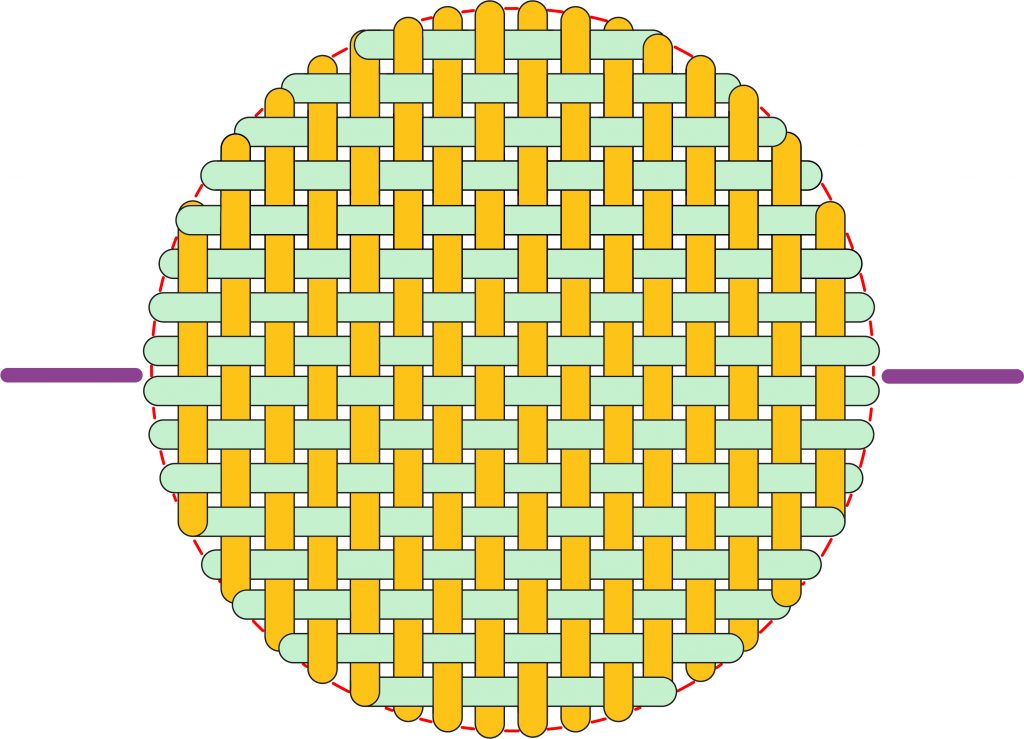
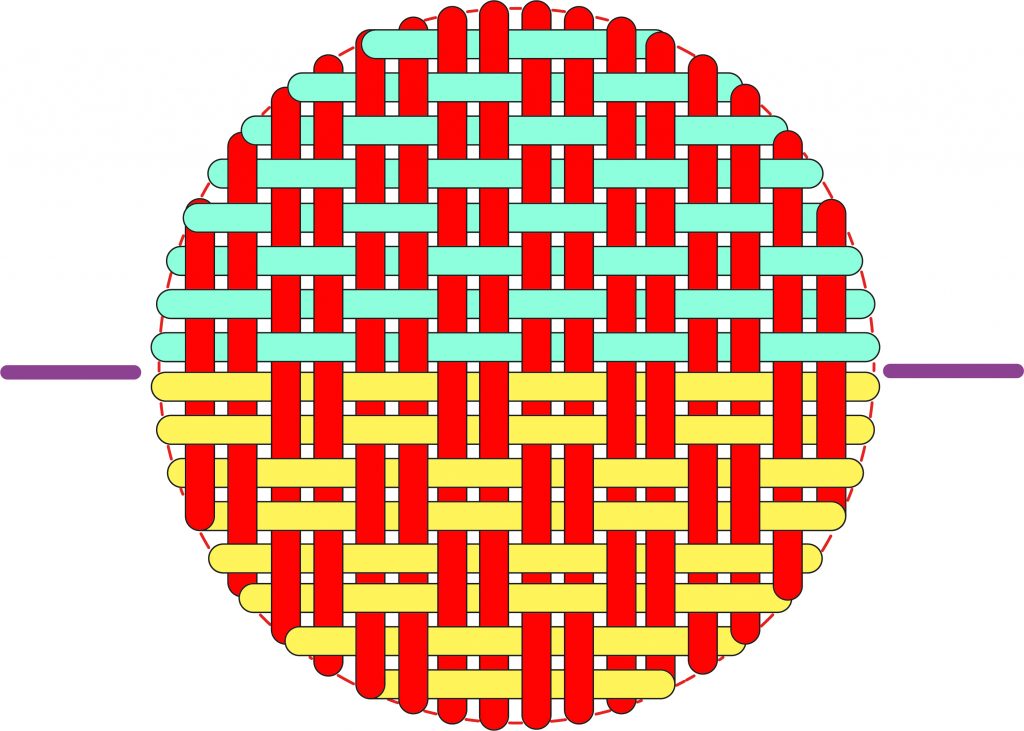
  • It is worth noting that if you are working the stitch on a curve with the purl on the outside of the curve, you will leave a slightly smaller, but evenly spaced gap on the top line so that the stitch fans around evenly.
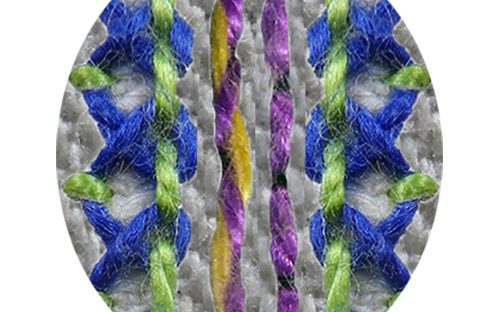
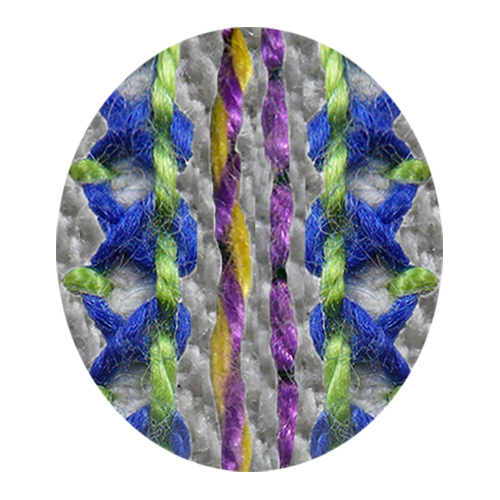
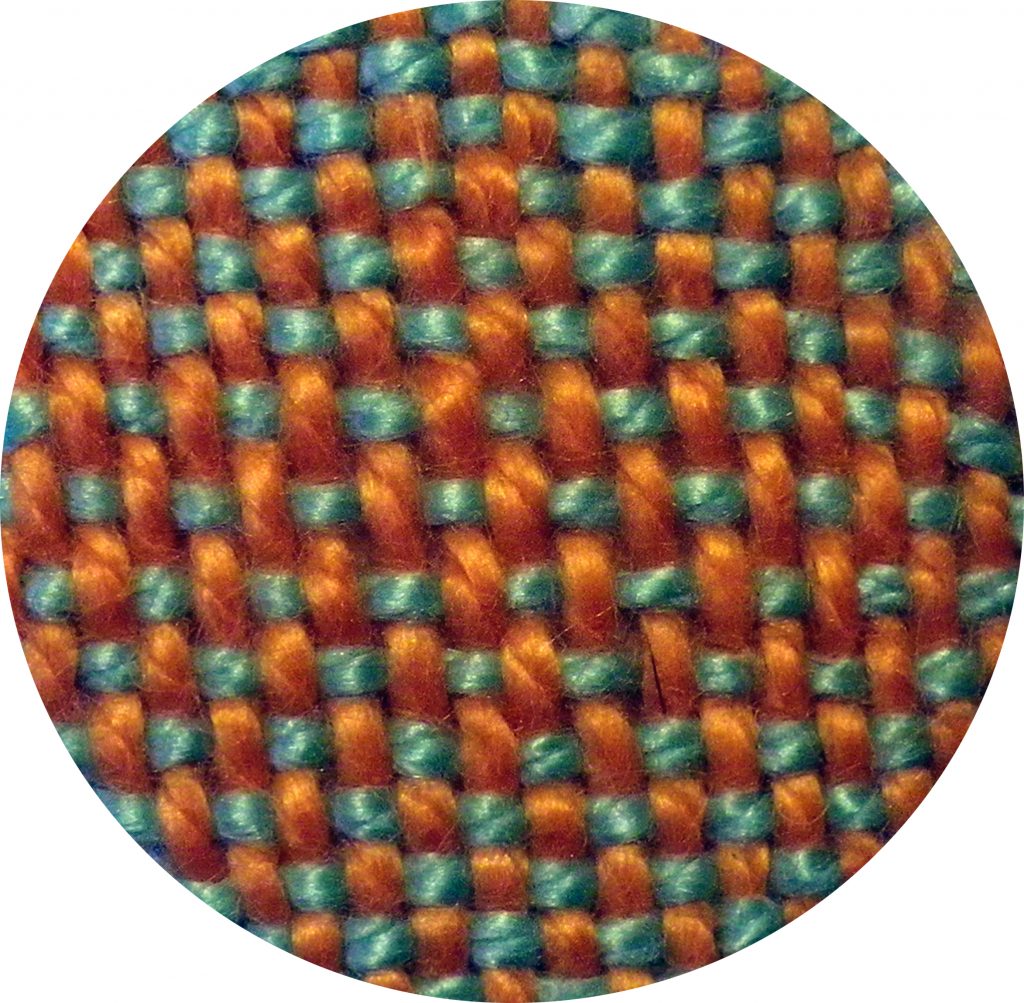
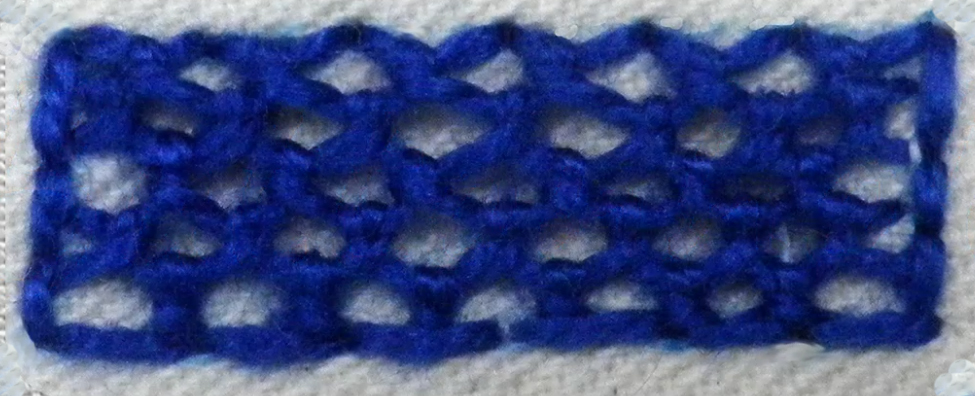
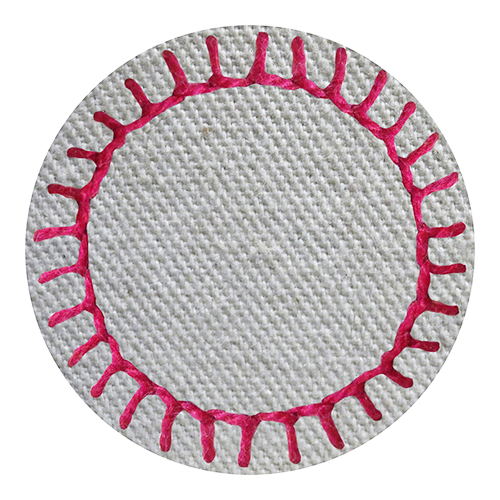
  • The image at the top of these instructions is a circle of blanket stitch with the purl on the inside of the curve.  This required that the gaps between the stitches opposite the purl edge were worked further apart with those between the stitches on the inside were closer but nevertheless, evenly spaced.

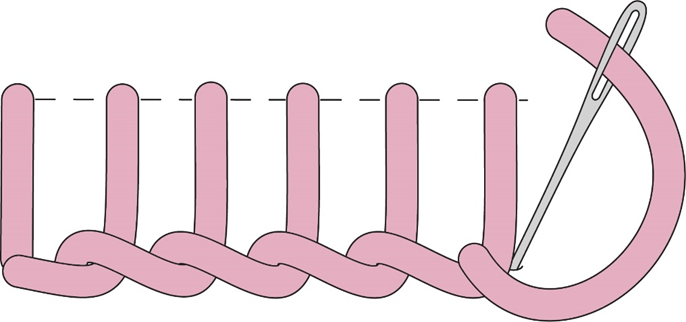
Referring to the video clip, in conjunction with the diagram above, secure at the end with a small couching stitch over the last loop.

And now for the video clip that covers all of the above.

(Don’t forget to click the icon in the bottom right-hand corner to get it to full screen).

Embroidery

Backstitch and its Variations

There are numerous iterations of backstitch in the video clip at the bottom of this page.  They are listed in the table below, in the order is which they appear, with the starting time for each variety in the right-hand column. 

Basic Backstitch10 seconds
Whipped Backstitch4 minutes 6 seconds
Laced Backstitch4 minutes 49 seconds
Interlaced Backstitch5 minutes 38 seconds

In the video clip on the tuition page, the small samples were worked with perle no. 5 thread on straight lines.   If you wish to experiment with the stitch before you work it onto your project, work on similar lines with similar thread.

The stitch instructions and diagrams appear below, with the video clip at the bottom of the page. If you would like a printable version, click here.

  • With a heat erasable pen, draw 4 parallel lines placing them about 10 mm apart.

Working the stitch:

Work basic backstitch onto all of the lines.

Basic Backstitch

Working from top to bottom, bring the needle up a stitch length before the beginning of the line.  Go in at the beginning of the line, coming up again a stitch length below the beginning of the stitch you are working.  Repeat as necessary, keeping your stitch length as even as possible.

Whipped Backstitch

To whip back stitch, bring your needle up out of the same hole as the first backstitch at the beginning of the line of stitching. Take your needle and thread over, then under each stitch.  It is advisable to use a tapestry needle when whipping.  A contrasting colour thread is often effective.

Laced Backstitch

Work a line of backstitch as instructed above.  With either the same thread, or a contrasting thread to provide interest, bring the needle up out of the same hole at the start of the line of backstitch.  Thereafter, referring to the diagram above, snake through the backstitches going from right to left, then from left to right continuing in this way until you reach the end of the line.  Go back into the fabric at the end of line, using the same hole as the backstitch.

Interlaced Backstitch (2 variations)

First variation:  When you have completed the line of backstitch, possibly changing to a contrasting thread, come up at the start of the backstitch line.  Go under the second backstitch.  Changing direction, go under the first backstitch and over the interlacing thread that came down from the first backstitch.  Continue by going under the third backstitch, changing direction, going under the second, taking the needle over the interlacing thread.  Keep going in this way until all the backstitches have been laced fishing off by going into the same hole as the backstitch at the end of the line.

Second variation:  Referring to the video clip, work short horizontal straight stitches next to the backstitches, lining them up with the middle point of each backstitch. When you have completed the line of straight stitches, possibly changing to a contrasting thread, come up at the start of the backstitch line.  Go under the straight stitch on the side and under the second backstitch.  Changing direction, go under the first backstitch and under the next straight stitch on the side.  Keep going in this way until all the backstitches have been laced.

And now for the video clip that covers all of the above.

(Don’t forget to click the icon in the bottom right-hand corner to get it to full screen).

Embroidery

Needle Weaving

Basic needle weaving is a simple, but effective way to fill a large space and is used in various ways thoughout the designs in our range of embroidery projects. This tuition page gives you the basics of needle weaving after which you might wish to attempt some loom weaving patterns that have been modified for needle weaving.

In the video clips on this page, the small samples were worked with perle no. 5 thread on circles measuring 20 mm in diameter. If you wish to experiment with the stitch before you work it onto your project, trace the template that is on the PDF instructions, onto your working fabric.

The stitch instructions and diagrams appear below, with the video clip at the bottom of the page. If you would like a printable version, click here.

  • Trace the 20 mm diameter circle with a heat erasable pen.
  • With the same heat erasable pen, draw vertical and horizontal lines down and across the middle of the circle.  These lines will be a useful guide. 

Single Weaving

When working both the warp and the weft stitches, it is usually better to start in the centre of any shape that you are working.  It helps you to set the angles that you need to use. 

The Warp Stitches

The warp stitches are long straight stitches that are worked over the shape in which you want to place needle weaving.  They are the stitches that will be woven through when you work the weft stitches. 

The sample in these instructions is a circle which means that there is no longer or shorter side.  On most other shapes, one side will be longer than the other and it is usually best to work the warp stitches over the shortest side.  This is because potentially, they loosen easily so the shorter the stitch, the less potential they have for loosening noticeably.

  • Starting on the centre vertical line, work vertical warp stitches to fill both sides of the circle. 
  • On circle of 20 mm diameter, you will probably fit in about 19 stitches, one in the middle and 9 on either side.
  • Come up at the top of the circle and go in at the bottom.
  • Leaving a sliver of fabric to show, come up at the bottom and go in at the top.  It is important to leave a little space between the warp stitches (about the width of a thread).  If you pack them too closely together you will have difficulty differentiating between each stitch when you start the weaving in the warp rows.  You will also find that the weaving begins to ‘bubble’ because you have too much thread in one small space. 
  • Keep working out to the side, trying to keep your warp stitches parallel to one another and evenly spaced.  Weaving is a forgiving technique and whilst you aim for straight, evenly spaced stitches, don’t fret if they aren’t perfect.  Once you have worked the weft rows through these stitches, they will mask anything that’s slightly crooked or slightly further apart.
  • Once you have completed the one side, return to the centre of the circle and work the other side.

The Weft Stitches (or rows)

  • Starting once again, in the centre come up through the fabric on the perimeter line of the circle.
  • Following the diagram above, work the first row going under the first warp stitch, over the second, under the third and so on.  Over one and under one for the entire row.
  • When you reach the other side, pull the thread taut and making sure that it is lying at right angles to the warp stitches, go into the fabric on the line, at the point where it crosses the line.
  • To work the next row, you have two options.  You can come up on the same side, leaving a space similar to that space you left between the warp stitches or you can return to the side where you started the first row, coming up below the first row leaving a similar space. 
  • So, if we assume that you returned to the same side as where you started, you started the first row by going under the first warp stitch so you start the second row by going over the first warp stitch.  Complete the row in the same way, going over where you went under (and vice versa) in the first row, going in on the other side leaving a similar spacing as you left at the start of the row.
  • Keep going in this way, alternating the sequence in every row.
  • As you work the weft rows, you will probably find that they ‘hang down’ a little.  That they don’t hug the previous weft stitch.  From the beginning of the third row start using your needle to push up the previous rows.  ‘Load’ the needle with warp stitches, as many as you can and before you pull through push the needle up hard.  This will push the previous weft row up so that it hugs the row before that.  Do this on every weft row.
  • Work to the bottom of the circle and then return to the middle to work the top.  Continue alternating the sequence as you work each row and instead of pushing up with your needle, push down so that the rows hug those below.

Double Weaving and Uneven Weaving

The Warp Stitches

Double and Uneven weaving are worked over two and then under two warp stitches.  With this in mind, you make it easier for yourself if the place two warp stitches close together (out and into the same hole), leave a space and then work the next pair.  This is demonstrated on the video clip. 

In line with the instructions for single weaving, start on the middle line of the circle working vertical pairs of stitches out to one side.  Return to the middle and work pairs of stitches out to the other side.  In total, you will work about 9 pairs of warp stitches over the 20 mm circle.

The Weft Stitches

Double Weaving:

  • Starting once again, in the centre come up through the fabric on the perimeter line of the circle.
  • Referring to the bottom half of the diagram above, go under two stitches, then over two and under two for the rest of the row. 
  • As with the single weaving, when you reach the other side, pull the thread taut and making sure that it is lying at right angles to the warp stitches, go into the fabric on the line, at the point where it crosses the line.
  • Work a second, identically sequenced row.
  • The third and fourth row are worked with the opposite sequence.  You start by going over the first two warp stitches, then under the next two and so on. 
  • As with the single weaving, continue to the bottom of the circle and then work the top half, alternating the sequence every time you have completed two weft rows.
  • Also as with the single weaving, use your needle to push up or down as you work the rows so that they hug the rows before.

Uneven Weaving:

  • Like the double weaving, you work over and under two warp stitches with the difference being that you change the sequence every row.  Following the top half of the diagram above, use similar spacing and use your needle to push up (or down) so that the weft rows hug one another.

And now for the video clip that covers all of the above.

(Don’t forget to click the icon in the bottom right-hand corner to get it to full screen).

Embroidery

Detached Buttonhole Stitch

Detached Buttonhole Stitch forms the basis for most needle lace techniques which are used throughout the designs in our range of embroidery projects.

In the video clip at the bottom of this page, the small sample was worked with perle no. 5 thread on a rectangle measuring 30 x 10 mm. If you wish to experiment with the stitch before you work it onto your project, there is a template on the printable PDF document, and you should work with similar threads. 

The stitch instructions and diagrams appear below, with the video clip at the bottom of the page. If you would like a printable version, click here.

  • Using perle #5 thread, work backstitch around the entire shape.  Aim to work 6 stitches on the longer sides and 3 on the shorter sides.  These backstitches provide an anchor for the detached buttonhole stitches in the first row and, also, define the shape that you wish to fill.

Working the stitch:

  • Coming out from under the backstitch, bring your needle up on the left side, as indicated in the diagram above.
  • Working from the top down, go under the first horizontal backstitch.  Note that you don’t go into the fabric, just under the backstitch and in later rows, through the loop. 
  • Making sure that the working thread is under the needle so that you catch the loop, pull through to form a buttonhole stitch. 
  • Work a detached buttonhole stitch through each backstitch in top row.
  • When you get to the other side, go into the fabric tucking your needle under the backstitch on that side.
  • Come up from under the backstitch further down, leaving sufficient space to accommodate the next row.
  • Stitch the next and subsequent rows by working a detached buttonhole stitch into every loop between the stitches in the previous row, going into the fabric at the end of each row and coming up further down in preparation for the next row.
  • When you get to the bottom of the shape, work each detached buttonhole stitch individually coming up from under the backstitch directly below the loop you need to attach.  With the needle going over the working thread, pull through and go into the fabric having crossed over the thread that comes out of the fabric.

And now for the video clip that covers all of the above.

(Don’t forget to click the icon in the bottom right-hand corner to get it to full screen).