Embroidery

Sheaf Stitch

Downloadable and printable instructions

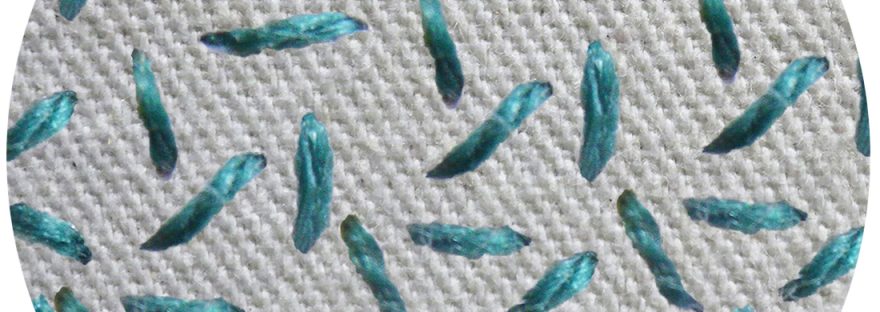
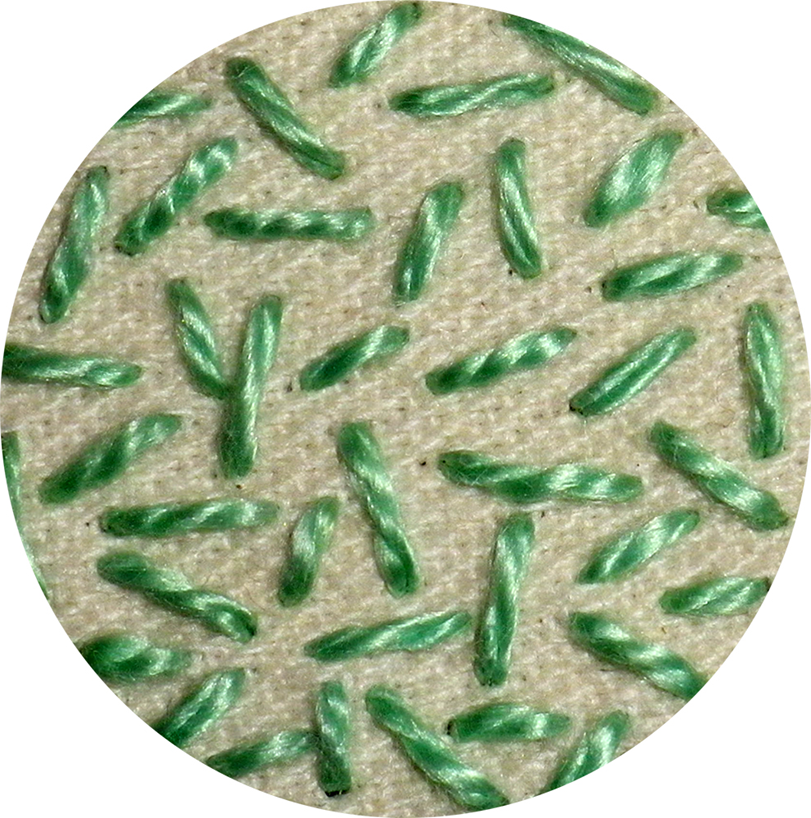
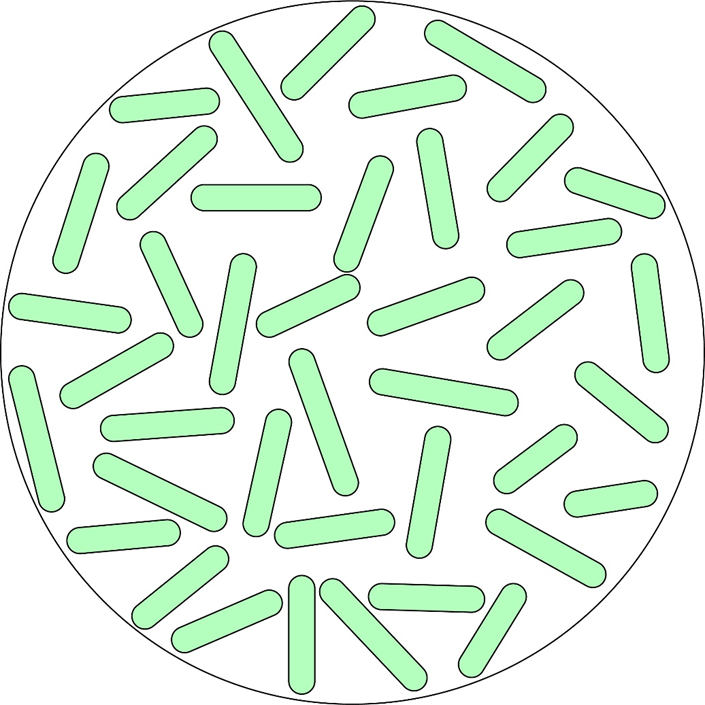
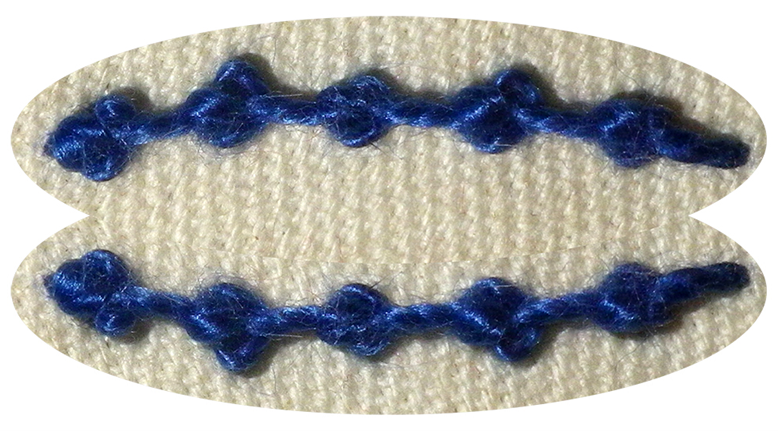
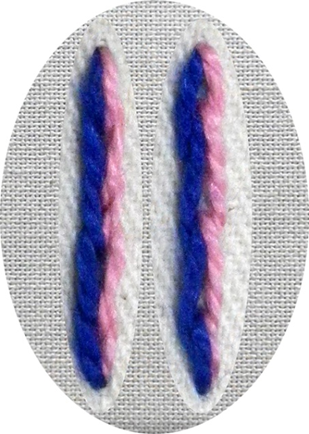
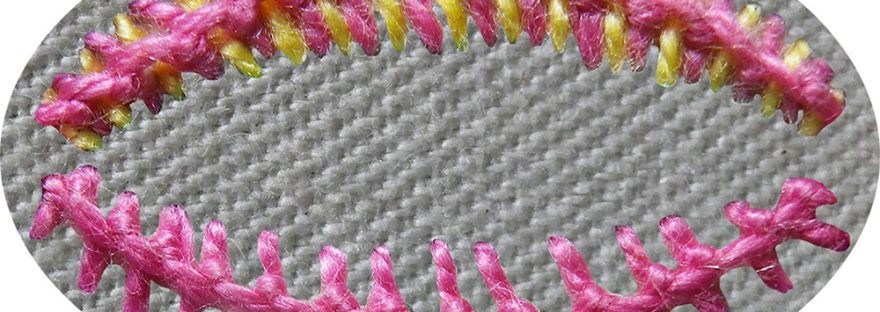
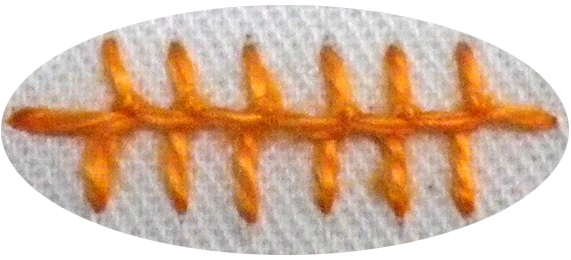
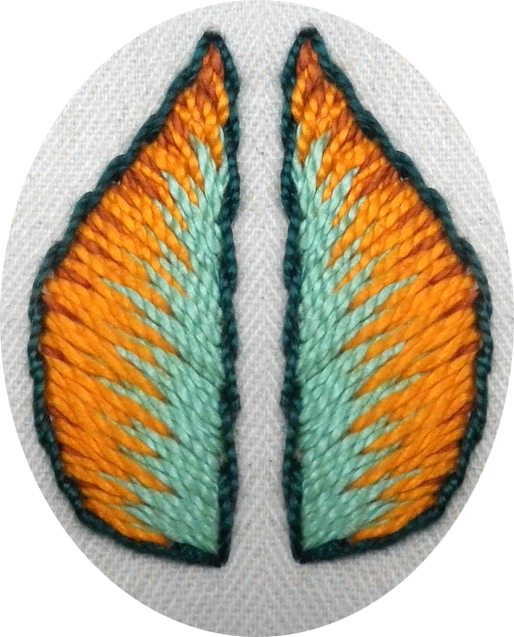
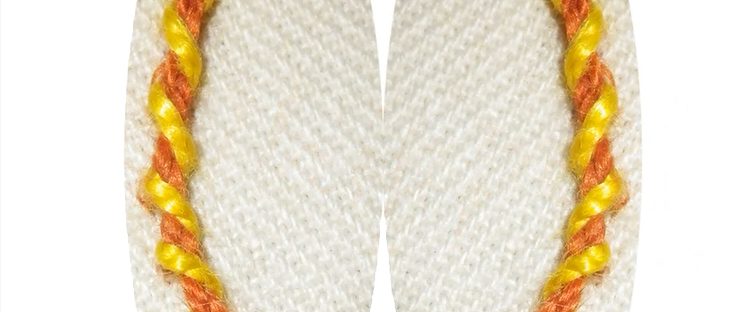
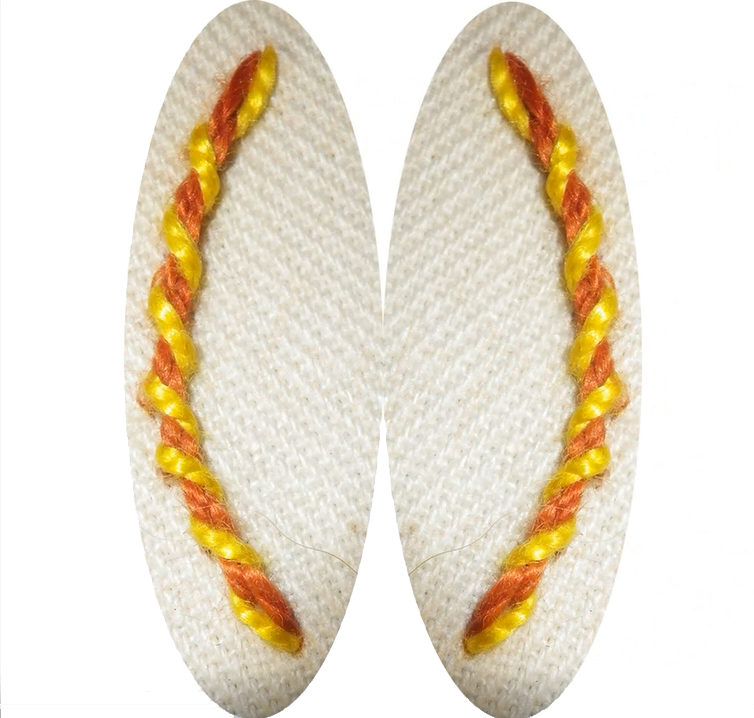
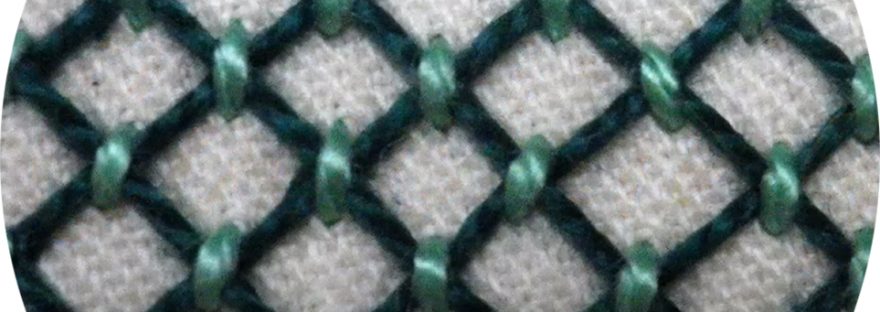
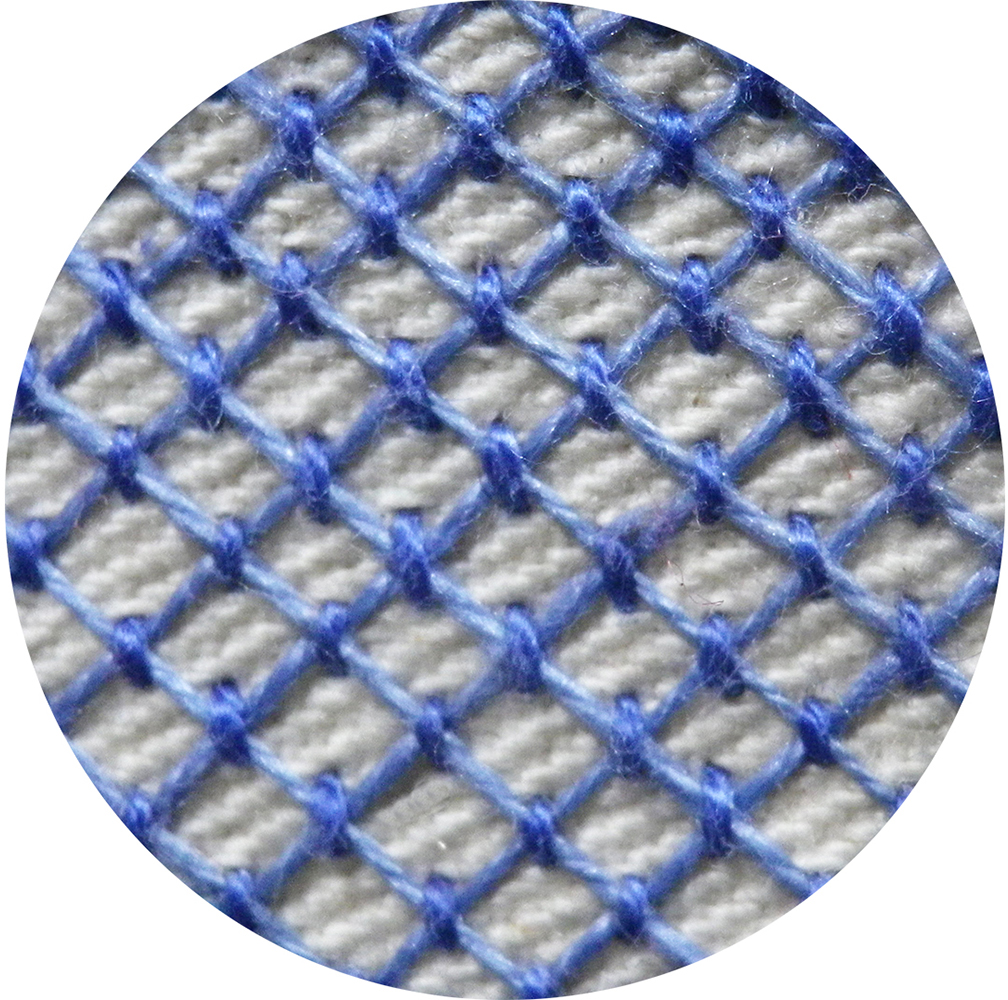
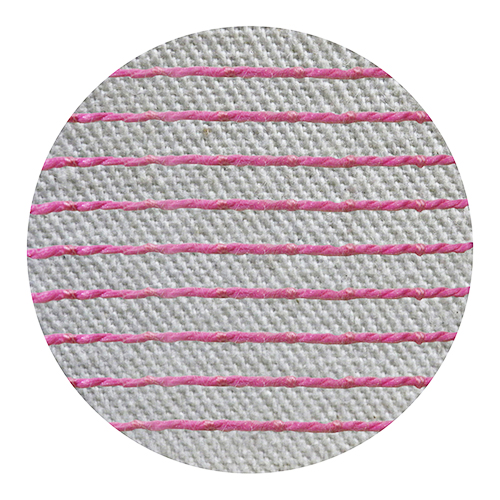
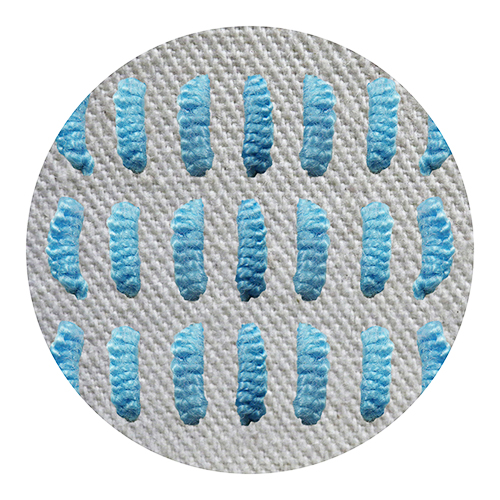
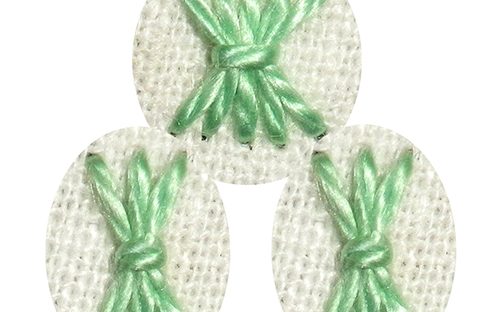
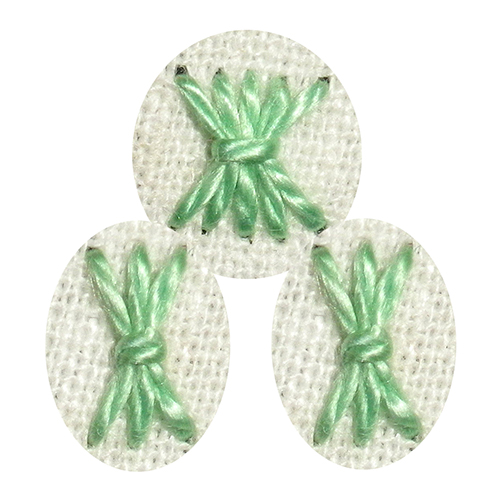
This pleasant little stitch comprises 3 or 5 vertical parallel stitches, placed slightly apart and drawn together with a couching stitch in the middle, giving them the look of a sheaf from which the name derives.  It is usually better to work a few of them together and they are particularly nice when worked as part of the random freestyle embroidery technique.

In the video clip at the bottom of this page, the small samples were worked with perle #5 thread between parallel lines that are 8 mm apart.   If you wish to experiment with the stitch before you work it onto your project, draw similar lines on your cloth with a heat erasable pen, using the template on the downloadable instructions.

Working the stitch:

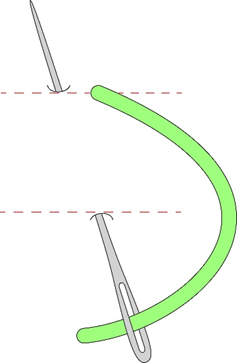
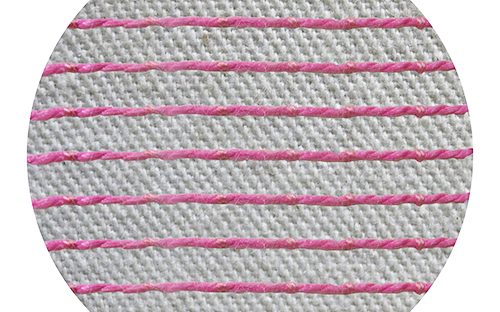
  • Start by working the straight stitch in the centre.  
  • Come up at the top and go in at the bottom.
  • Come up again at the top on the left of the straight stitch.
  • Go in at the bottom making sure that the space left between the stitches is the same at the top and the bottom.
  • Come up again at the top to the right of the middle stitch. Try to keep the spacing between the stitches as even as possible.
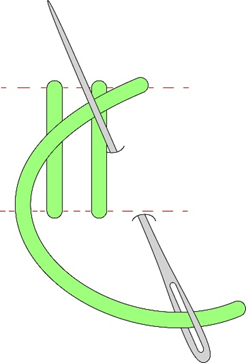
  • Go in at the bottom, making sure that the space left between the stitches is the same at the top and the bottom. 
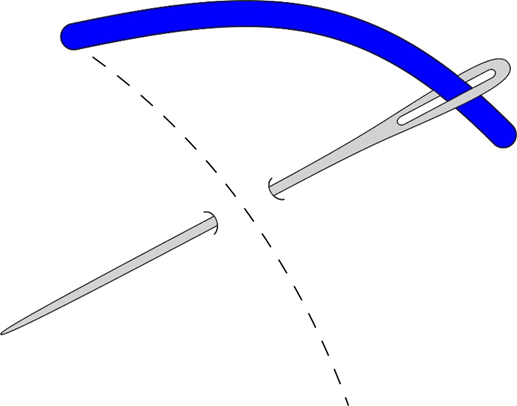
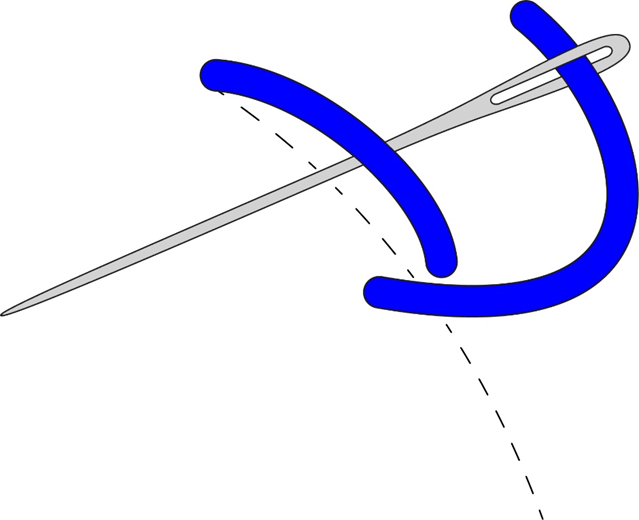
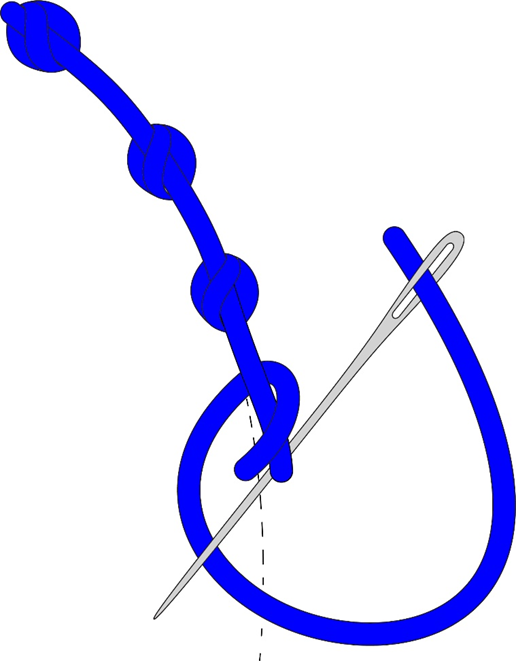
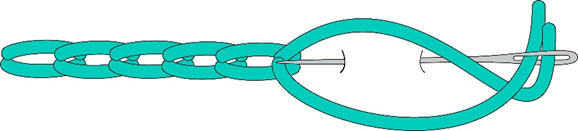
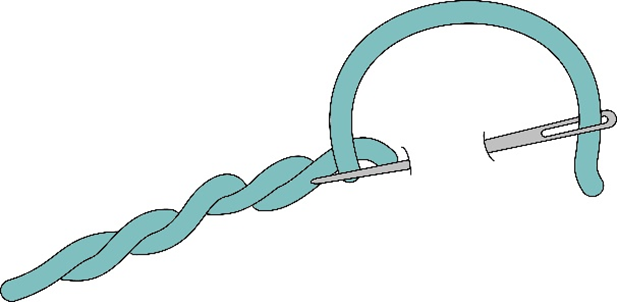
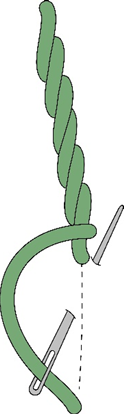
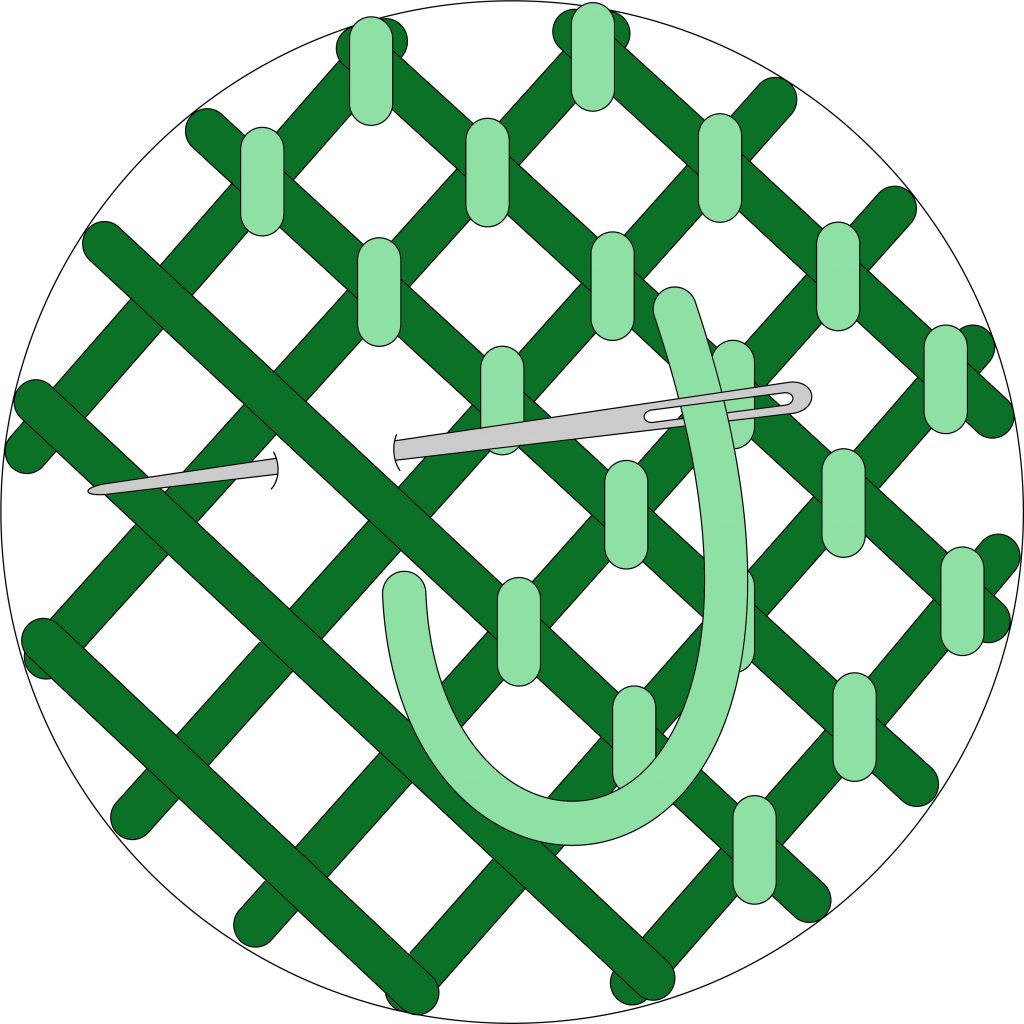
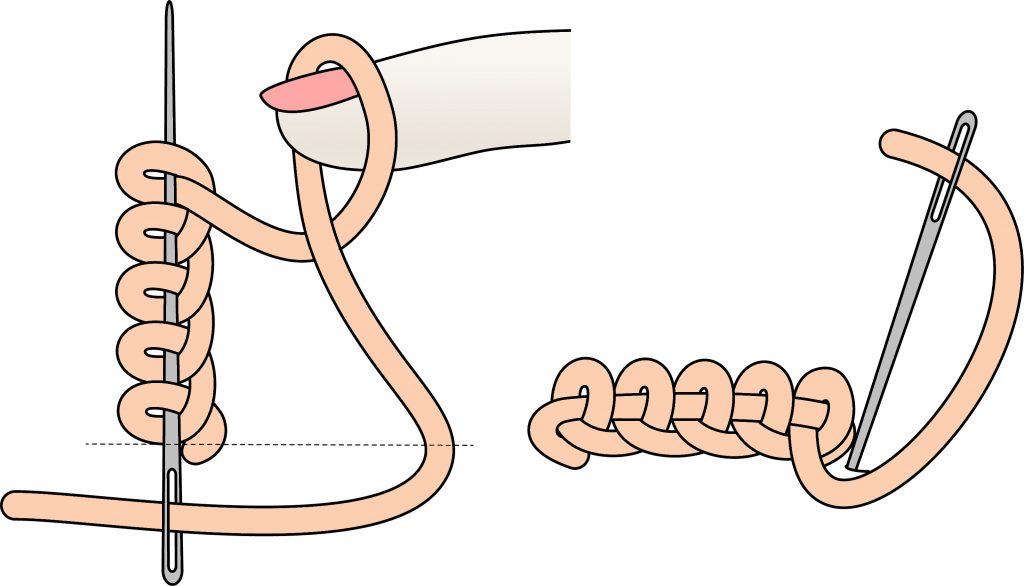
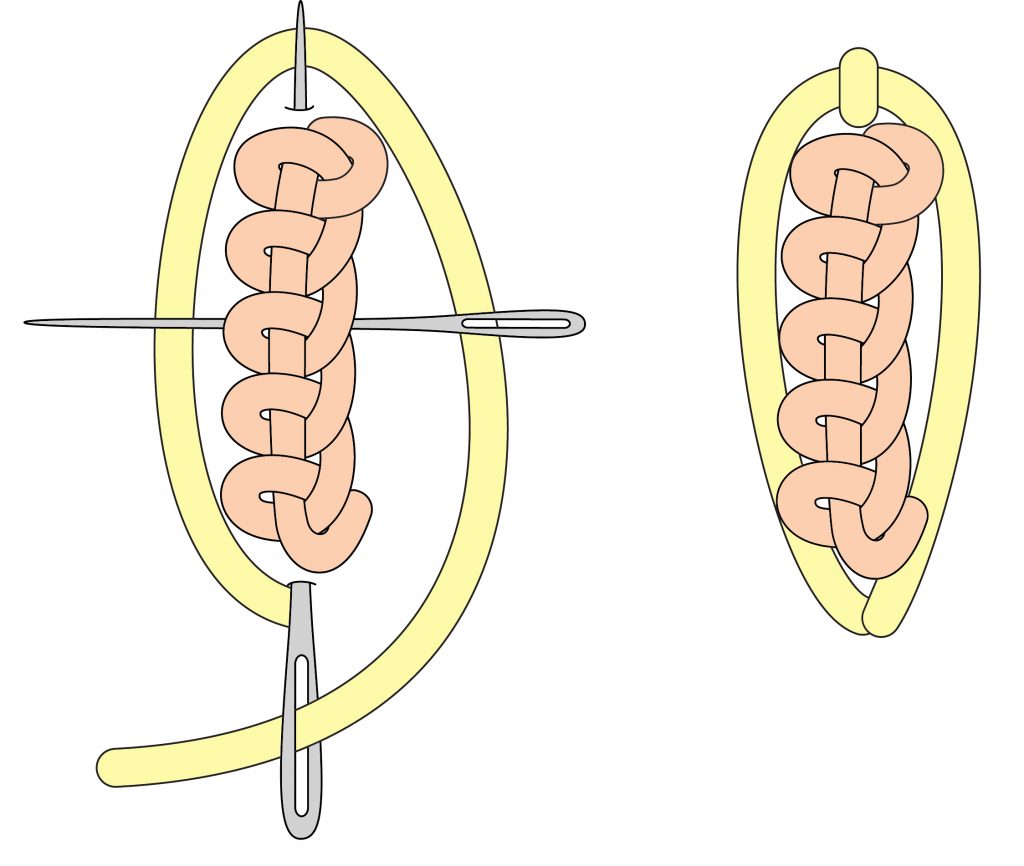
  • Before you pull through, come up adjacent to the middle of the first, or centre stitch. Make sure the loop of the third stitch is to the left of the needle.
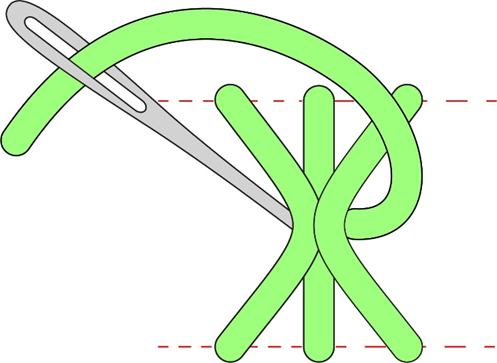
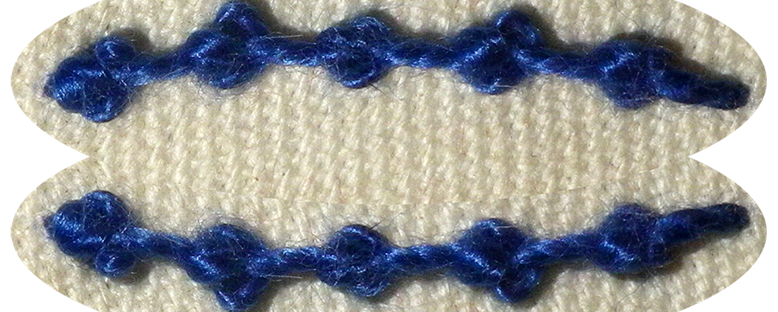
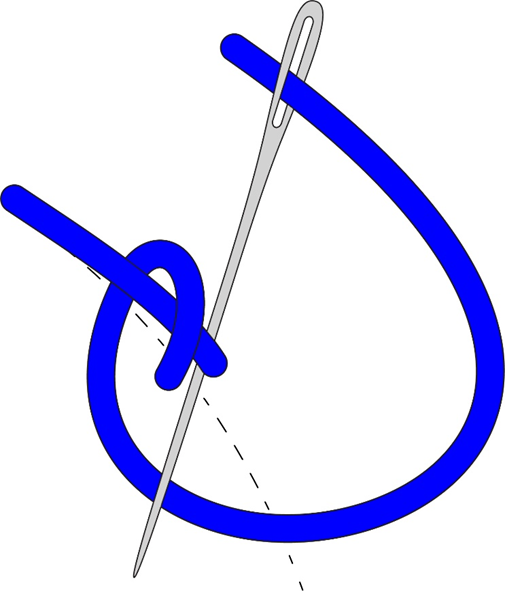
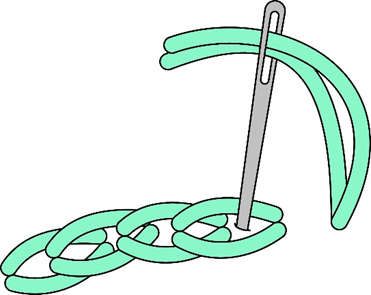
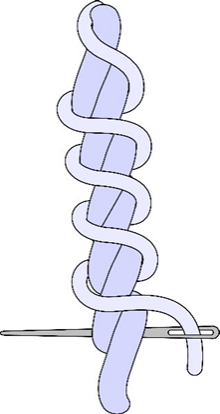
  • Working to the left, take the thread over all of the stitches and work a couching stitch, going back into the same hole that you came out of on the right of the middle stitch.
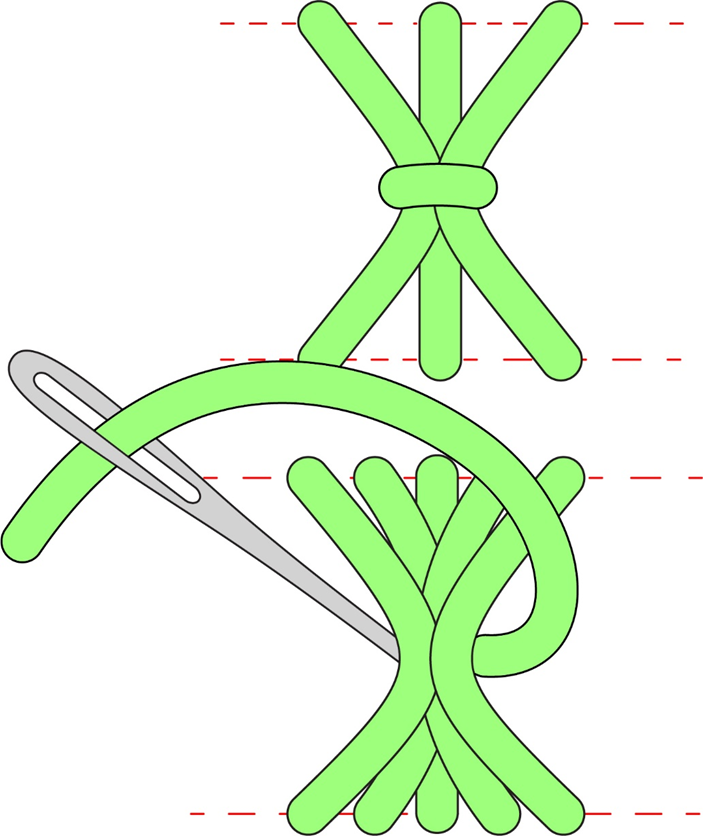
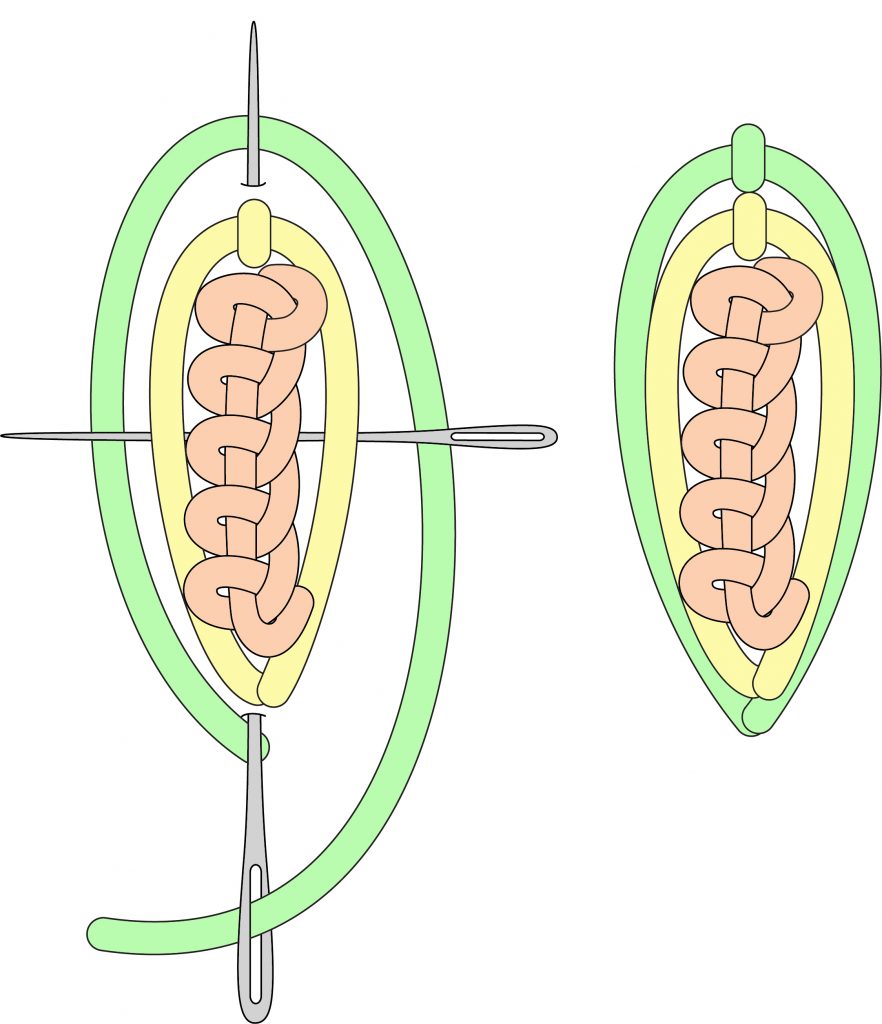
  • A wider stitch can be worked with 5 parallel stitches that are drawn together with a couching stitch.

Tip: without overdoing it, my personal experience is that longer parallel straight stitches make a better sheaf stitch so, err on the long rather than the short side.

And now for the video clip that covers all of the above.

(Don’t forget to click the icon in the bottom right-hand corner to get it to full screen).

Embroidery

Seeding

Downloadable and printable instructions

In the video clip at the bottom of this page, the small sample was worked with perle #5 thread on a circle measuring 30 mm in diameter.   If you wish to experiment with the stitch before you work it onto your project, draw a similar circle on your cloth with a heat erasable pen using the template on the downloadable instructions.

Working the stitch:

  • Fill the space with small, straight stitches that face in different directions and do not touch each other.
  • More difficult than it looks at first glance, you should make sure that all the stitches that are close to one another should not lie at the same angle.
  •  All the stitches should be done at random.  Try to make them of similar lengths.

Depending on what the project requires, I find that using a single strand of cotton and making the stitches slightly longer, rather than shorter, gives the best effect.

And now for the video clip that covers all of the above.

(Don’t forget to click the icon in the bottom right-hand corner to get it to full screen).

Embroidery

Palestrina (Double Knot) Stitch

Downloadable and printable PDF instructions.

In the video clip at the bottom of this page, the small sample was worked with perle no. 5 thread on a curved line.   If you wish to experiment with the stitch before you work it onto your project, draw a 20 to 30 mm curved line with a heat erasable pen.

Working the stitch:

  • Come up at the beginning of the line and, working downwards towards yourself, scoop under the line by going in on the right of the line and coming up on the left of the line and pulling through.
  • How far down the line you make this first stitch will depend on whether you wish to start with a knot or a stitch.  This mini-workshop shows you both options.  The diagram above leaves sufficient space for a stitch whilst the video clip starts with the knot.
  • From where you have come up on the left, go under the diagonal first stitch that you created in the first step.
  • As you pull through, make sure that the thread you are pulling through is facing towards the top.
  • Guide the working thread around towards the right and take the needle under the diagonal stitch, to the right of the loop that you worked in step 2 above.
  • Making sure that the tip of the needle goes over the working thread that has come from the left, pull through to tighten the knot.
  • Continue down the line repeating steps 1 to 3 above, spacing the knots as you need to.  Depending on what you are doing with the stitch they could be closer or further apart.
  • When you have completed the last knot at the bottom of the line, go into the fabric and end off at the back.  Once again, you have a choice.  You might take the needle into the fabric immediately after completion of the knot or you might make a longer stitch before you go into the fabric.  It will all depend on what you are doing with the stitch.

And now for the video clip that covers all of the above.

(Don’t forget to click the icon in the bottom right-hand corner to get it to full screen).

Embroidery

Split and Split Backstitch

In the video clip on the tuition page, the small sample was worked with two colours of perle #5 thread on vertical parallel lines of 5 cm, placed 1 cm apart. If you wish to experiment with the stitch before you work it onto your project, draw similar lines on your cloth with a heat erasable pen.

These two stitches produce a finished result that is almost identical.  In general, it is easier to work split backstitch.

The stitch instructions and diagrams appear below, with the video clip at the bottom of the page. If you would like a printable version, click here.

Working the stitches:

Split Stitch

  • Work with 2 strands of thread. 
  • Come up at the beginning of the line. 
  • Go in again a little way along and before pulling through, come up again in the middle of the stitch, taking your needle up between the 2 strands of thread. 
  • Pull through to tighten.
  • Finish with a straight stitch that is not split.

Split Backstitch

This is easier to work and gives a more pleasing result than traditional split stitch. 

  • Work a backstitch starting a stitch length away from the beginning of the line. 
  • Come up further along the line – a stitch length – and instead of going back into the hole at the end of the first stitch as you would for normal backstitch, take the needle down between the two threads of the previous backstitch, making sure that the threads of that stitch lie side by side with no twists. 
  • Keep going in this way.  Finish with a backstitch that is not split.

And now for the video clip that covers all of the above.

(Don’t forget to click the icon in the bottom right-hand corner to get it to full screen).

Embroidery

Loop Stitch

In the video clip on the tuition page, the small sample was worked with two colours of perle #5 thread on horizontal parallel lines of 5 cm, placed 1 cm apart. If you wish to experiment with the stitch before you work it onto your project, draw similar lines on your cloth with a heat erasable pen.

The stitch instructions and diagrams appear below, with the video clip at the bottom of the page. If you would like a printable version, click here.

Working the stitch:

  • Come up in the middle of the line that you wish to cover. 
  • Go in a little way to the left on the top line.
  • Come up on the bottom line, directly below where you went in on the top line
  • Go under the first stitch and over the working thread.  Pull through. 
  • Go in at the top, to the left of where you went in last time. 
  • Come up at the bottom and go under the second stitch, over the loop of thread and pull through. 
  • Repeat as required. 

If the rib that is created down the centre line is not sitting where you would like it to be, it can be moved by adjusting the tension of the stitches.

And now for the video clip that covers all of the above.

(Don’t forget to click the icon in the bottom right-hand corner to get it to full screen).

Embroidery

Outline Stitch

There are two versions of Outline Stitch in the video clip on this page.  They are listed in the table below, in the order is which they appear, with the starting time for each variety in the right-hand column. 

Outline Stitch on a straight line22 seconds
Outline Stitch on a curved line2 minutes 52 seconds

In the video clip on this page, the small sample was worked with perle no. 5 thread on a leaf shape.   If you wish to experiment with the stitch before you work it onto your project, the template for this leaf is in the downloadable PDF instructions and you should work it along similar lines with similar thread.

  • With a heat erasable pen, draw the template on your cloth.

Working the stitch:

  • It is usually best to do this stitch with one strand of thread. 
  • Working from left to right, come up at the beginning of the line. 
  • Go in on the line and before pulling the thread through, come up halfway back on the line.  Pull through. 
  • Go into the fabric halfway further and come up just a little past halfway back, so that you are not coming up in the same hole as where the first stitch finished. 
  • Continue to the end of the outline. Take your thread to the back and end off.

When using outline stitch as a stem stitch, come up on the right of the line and go in on the left of the line, creating a diagonal stitch which goes over the line.   Refer to the instructions and video clips for stem stitch at this link.

And now for the video clip that covers all of the above.

(Don’t forget to click the icon in the bottom right-hand corner to get it to full screen).

Embroidery

Stem and Whipped Stem Stitch

There are two versions of Outline Stitch in the video clip on this page.  They are listed in the table below, in the order is which they appear, with the starting time for each variety in the right-hand column. 

Basic Stem Stitch9 seconds
Whipped Stem Stitch1 minute 3 seconds

In the video clip on this page, the small sample was worked with perle no. 5 thread on a 3 cm curved line.   If you wish to experiment with the stitch before you work it onto your project, you should work it along a similar line with similar thread.

  • With a heat erasable pen, draw a 3 cm curved line on your cloth.

Working the stitch:

  • Working from top to bottom, come up slightly to the right of the line.
  • If you are working with the thicker perle #5 thread, your stitch length will be about 5 mm long.  Finer threads would need correspondingly shorter stitches.
  • Leaving a stitch length space, go into the fabric slightly to the right of the line, coming up halfway back to the right of the line.   
  • Pull through. 

When using stem stitch as an outline stitch, come up on the line and go in on the line.   Refer to the instructions and video clips for outline stitch at this link.

Whipped Stem Stitch

  • To whip stem stitch, bring your needle up adjacent to the beginning of the line of stem stitch. 
  • Take your needle and thread over, then under the section where that stitch and the next stitch lie adjacent to one another. 
  • It is advisable to use a tapestry needle when whipping. 
  • A contrasting colour thread is often effective.

And now for the video clip that covers all of the above.

(Don’t forget to click the icon in the bottom right-hand corner to get it to full screen).

Embroidery

Basic Trellis Couching

Trellis couching is one of the mainstays of Crewel Embroidery.

In the video clip on this page, the small sample was worked with perle no. 5 thread on a circle measuring 30 mm in diameter. If you wish to experiment with the stitch before you work it onto your project, there is a template for the circle on the downloadable PDF instructions, and you should work with similar threads. 

The stitch instructions and diagrams appear below, with the video clip at the bottom of the page. If you would like a printable version, click here.

  • With a heat erasable pen, draw a 30 mm diameter circle.
  • Placing the lines 5 mm apart, draw a diagonal grid over the circle, as depicted in the diagram above.

Working the stitch:

  • Using thread colour no. 1 (dark green in the above diagram), work a layer of long straight stitches across the area. These can be vertical or diagonal.
  • Work another layer of long straight stitches that are placed at right angles to the first layer.
  • Using thread colour no. 2 (light green in the above diagram), work small, straight couching stitches over the intersection of the stitches. In general, the couching stitches should be just long enough to cover the intersection, but should not push the layers of long straight stitches out of place.  You can choose, however, to make them longer.  The direction of these stitches – whether vertical or horizontal – does not matter, provided they all go in the same direction.

And now for the video clip that covers all of the above.

(Don’t forget to click the icon in the bottom right-hand corner to get it to full screen).

Embroidery

Simple Couching

In the video clip on this page page, the small sample was worked with 2 colours of perle #5 thread on a 30 mm diameter circle. If you wish to experiment with the stitch before you work it onto your project, the template on the downloadable PDF instructions apply, and you should work with similar threads. 

The stitch instructions and diagrams appear below, with the video clip at the bottom of the page. If you would like a printable version, click here.

  • With a heat erasable pen, draw a 30 mm diameter circle.

Working the stitch:

  • Use two threaded needles. 
  • On the first needle will be the thread that will be couched down.  This could be a single strand, two strands, maybe a twisted thread or possibly a metallic thread.
  • On the second needle will be the thread with which you will work the little couching stitches.  This may be the same thread and colour as the couched thread, but you may choose to use a contrasting colour.  Usually, it will be threaded with a single strand but this will all depend on what you are doing with the couching technique.
  • Bring the first needle up at the beginning of the circle or line and park it. 
  • Using the second needle, work small stitches over the main thread.  Come out of the fabric, take the needle over the couched thread and go back into the same hole you came out of.
  • It is important that these stitches should not have a tight tension.  If you pull too tightly, the couched thread will show kinks and you want it to look like a straight even line.  So, when you pull the couching stitch through only pull until the thread is there, no tighter.

And now for the video clip that covers all of the above.

(Don’t forget to click the icon in the bottom right-hand corner to get it to full screen).

Embroidery

Cast-On Buttonhole Bar

There are a few variations of this stitch in the video clip on this page.  They are listed in the table below, in the order is which they appear, with the starting time for each variety in the right-hand column. 

Basic Cast-On Buttonhole Bar5 seconds
Lazy Daisy Cast-On Buttonhole Bar (single)1 minute 18 seconds
Lazy Daisy Cast-On Buttonhole Bar (double)1 minute 43 seconds

In the video clip on the tuition page, the small samples were worked with perle no. 5 thread.   If you wish to experiment with the stitch before you work it onto your project, work with similar thread.

  • With a heat erasable pen, draw 2 parallel horizontal lines placing them about 5 mm apart.  Work the buttonhole bars between those lines.

The stitch instructions and diagrams appear below, with the video clip at the bottom of the page. If you would like a printable version, click here.

Working the stitch:

  • Bring the needle up at the beginning of the line. 
  • Take it in at the end of the line and bring it up again at the beginning of the line, making sure you don’t snag the thread and leaving a loop of thread on the top. 
  • The needle should remain in the fabric, facing up. 
  • Twist the thread of the loop over your finger once and place it over needle, pull it to tighten down the needle.
  • Cast on as many loops as you need to, pull the needle through, tighten the remaining thread of the original loop and go back into the fabric at the end of the line.

Add a tweak with detached chain stitches:

Lazy Daisy Cast-On Buttonhole Bar (single)

  • Insert a spare needle under the buttonhole bar.
  • Bring the working needle up through the fabric just below the base of the buttonhole bar.  Go back into the same hole coming up just about the tip of the bullion knot. 
  • Guiding the thread under both sides of the spare needle and under the tip of the working needle, pull through. 
  • When you tighten the lazy daisy stitch try to ensure that it lies slightly underneath the buttonhole bar.  This will cause it to pop out a bit, making it more pronounced. 
  • Finish the lazy daisy stitch with a small couching stitch that catches the loop, holding it in place.

Lazy Daisy Cast-On Buttonhole Bar (double)

  • Having worked a single lazy daisy as directed above, remove the spare needle and put it back going under the single lazy daisy as well as the buttonhole bar.
  • Work a second lazy daisy in the same way, started lower than, and finishing above the first.

And now for the video clip that covers all of the above.

(Don’t forget to click the icon in the bottom right-hand corner to get it to full screen).