There are two versions of Outline Stitch in the video clip on this page. They are listed in the table below, in the order is which they appear, with the starting time for each variety in the right-hand column.
Outline Stitch on a straight line
22 seconds
Outline Stitch on a curved line
2 minutes 52 seconds
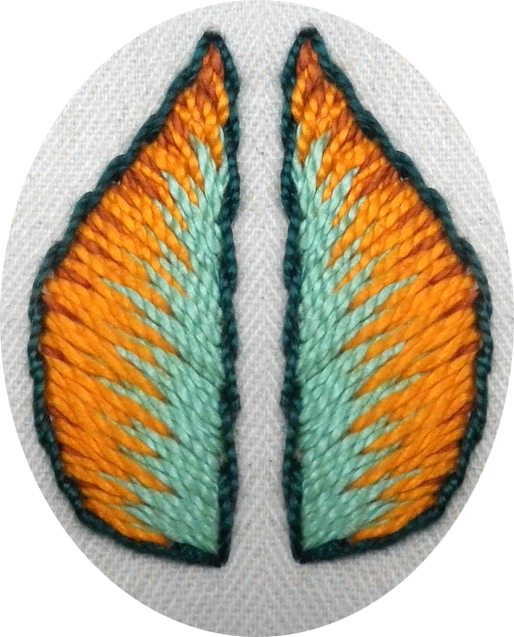
In the video clip on this page, the small sample was worked with perle no. 5 thread on a leaf shape. If you wish to experiment with the stitch before you work it onto your project, the template for this leaf is in the downloadable PDF instructions and you should work it along similar lines with similar thread.
With a heat erasable pen, draw the template on your cloth.
Working the stitch:
It is usually best to do this stitch with one strand of thread.
Working from left to right, come up at the beginning of the line.
Go in on the line and before pulling the thread through, come up halfway back on the line. Pull through.
Go into the fabric halfway further and come up just a little past halfway back, so that you are not coming up in the same hole as where the first stitch finished.
Continue to the end of the outline. Take your thread to the back and end off.
When using outline stitch as a stem stitch, come up on the right of the line and go in on the left of the line, creating a diagonal stitch which goes over the line. Refer to the instructions and video clips for stem stitch at this link.
And now for the video clip that covers all of the above.
(Don’t forget to click the icon in the bottom right-hand corner to get it to full screen).
There are two versions of Outline Stitch in the video clip on this page. They are listed in the table below, in the order is which they appear, with the starting time for each variety in the right-hand column.
Basic Stem Stitch
9 seconds
Whipped Stem Stitch
1 minute 3 seconds
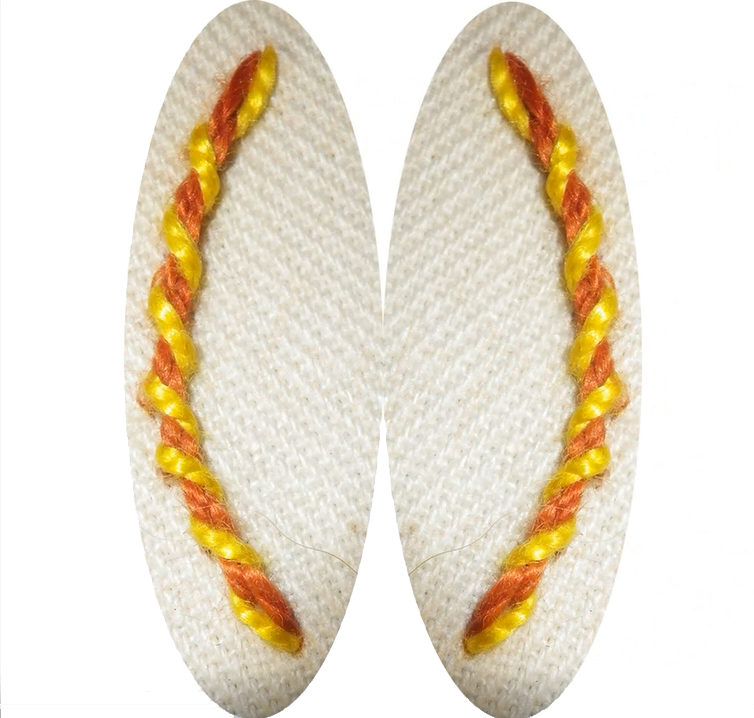
In the video clip on this page, the small sample was worked with perle no. 5 thread on a 3 cm curved line. If you wish to experiment with the stitch before you work it onto your project, you should work it along a similar line with similar thread.
With a heat erasable pen, draw a 3 cm curved line on your cloth.
Working the stitch:
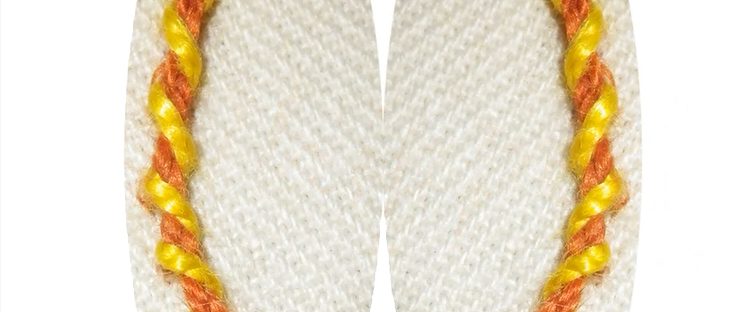
Working from top to bottom, come up slightly to the right of the line.
If you are working with the thicker perle #5 thread, your stitch length will be about 5 mm long. Finer threads would need correspondingly shorter stitches.
Leaving a stitch length space, go into the fabric slightly to the right of the line, coming up halfway back to the right of the line.
Pull through.
When using stem stitch as an outline stitch, come up on the line and go in on the line. Refer to the instructions and video clips for outline stitch at this link.
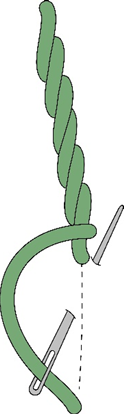
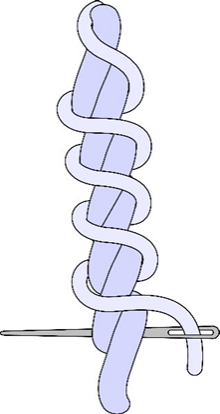
Whipped Stem Stitch
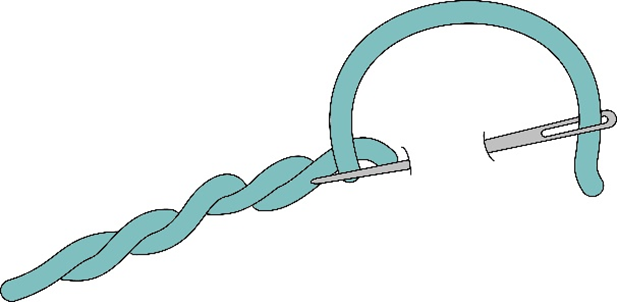
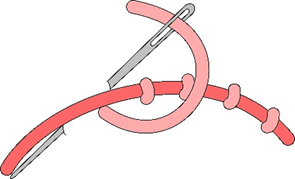
To whip stem stitch, bring your needle up adjacent to the beginning of the line of stem stitch.
Take your needle and thread over, then under the section where that stitch and the next stitch lie adjacent to one another.
It is advisable to use a tapestry needle when whipping.
A contrasting colour thread is often effective.
And now for the video clip that covers all of the above.
(Don’t forget to click the icon in the bottom right-hand corner to get it to full screen).
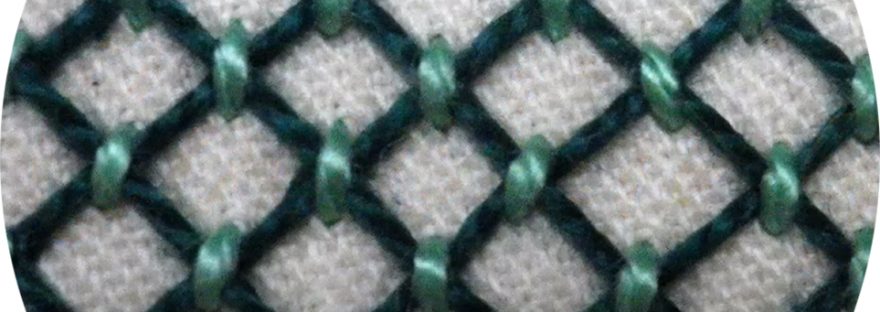
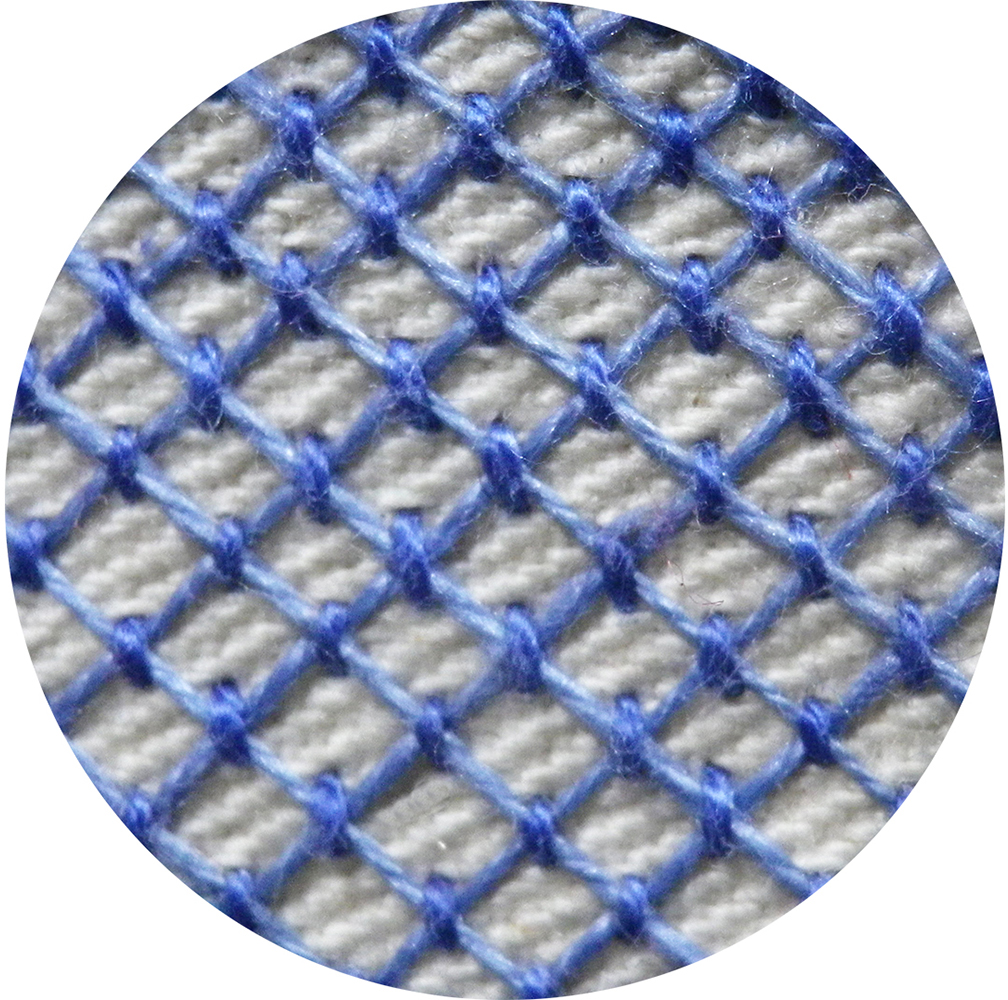
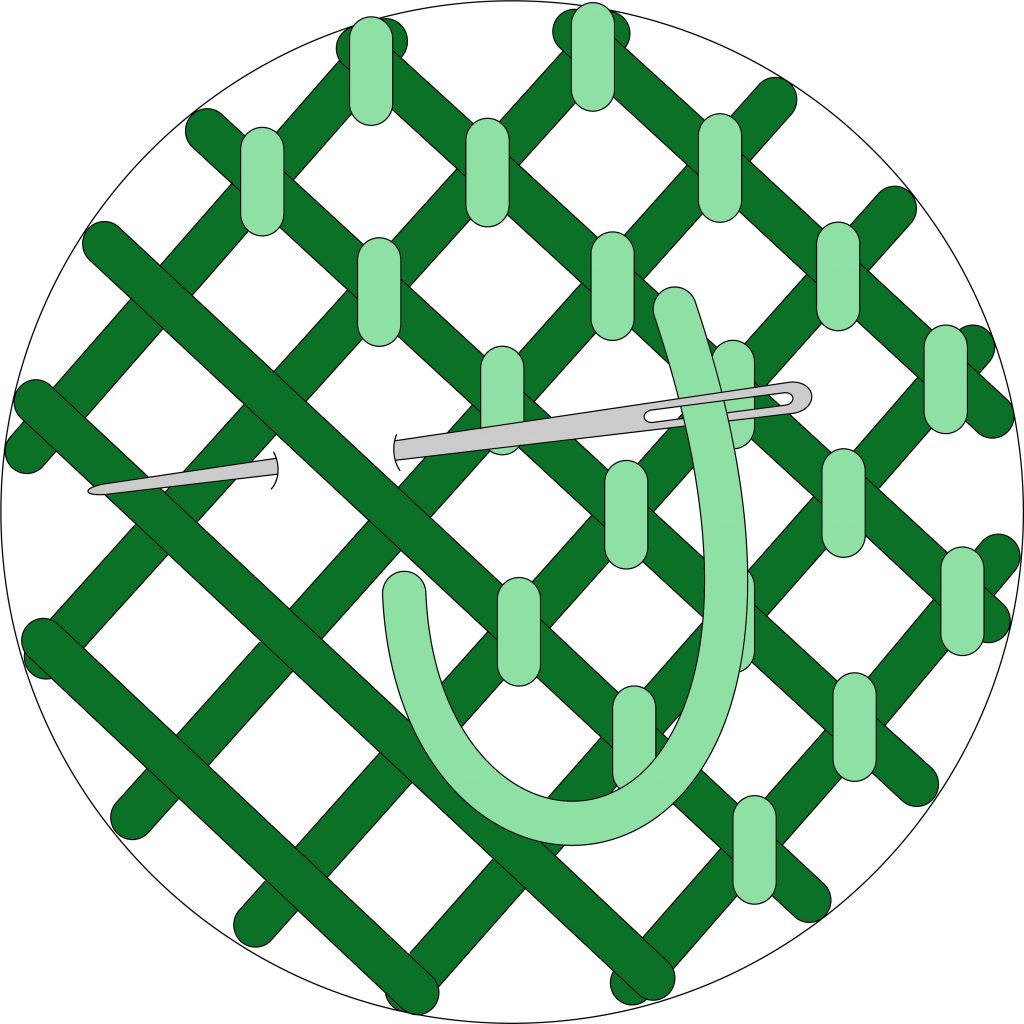
Trellis couching is one of the mainstays of Crewel Embroidery.
In the video clip on this page, the small sample was worked with perle no. 5 thread on a circle measuring 30 mm in diameter. If you wish to experiment with the stitch before you work it onto your project, there is a template for the circle on the downloadable PDF instructions, and you should work with similar threads.
The stitch instructions and diagrams appear below, with the video clip at the bottom of the page. If you would like a printable version, click here.
With a heat erasable pen, draw a 30 mm diameter circle.
Placing the lines 5 mm apart, draw a diagonal grid over the circle, as depicted in the diagram above.
Working the stitch:
Using thread colour no. 1 (dark green in the above diagram), work a layer of long straight stitches across the area. These can be vertical or diagonal.
Work another layer of long straight stitches that are placed at right angles to the first layer.
Using thread colour no. 2 (light green in the above diagram), work small, straight couching stitches over the intersection of the stitches. In general, the couching stitches should be just long enough to cover the intersection, but should not push the layers of long straight stitches out of place. You can choose, however, to make them longer. The direction of these stitches – whether vertical or horizontal – does not matter, provided they all go in the same direction.
And now for the video clip that covers all of the above.
(Don’t forget to click the icon in the bottom right-hand corner to get it to full screen).
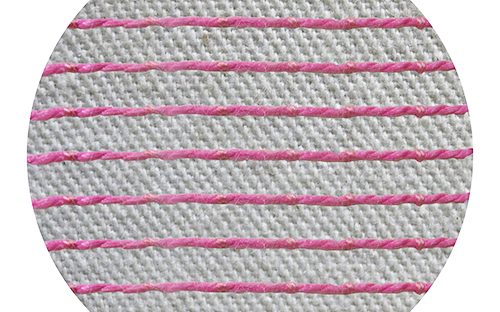
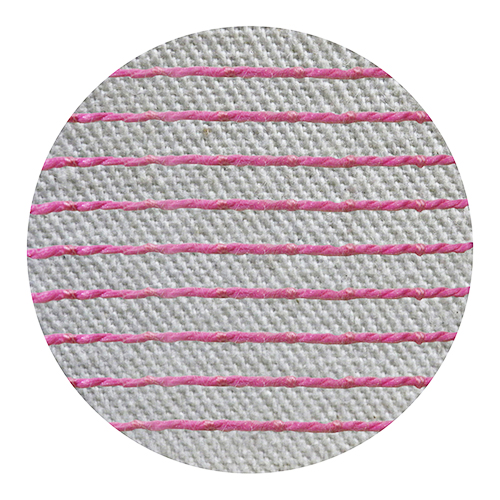
In the video clip on this page page, the small sample was worked with 2 colours of perle #5 thread on a 30 mm diameter circle. If you wish to experiment with the stitch before you work it onto your project, the template on the downloadable PDF instructions apply, and you should work with similar threads.
The stitch instructions and diagrams appear below, with the video clip at the bottom of the page. If you would like a printable version, click here.
With a heat erasable pen, draw a 30 mm diameter circle.
Working the stitch:
Use two threaded needles.
On the first needle will be the thread that will be couched down. This could be a single strand, two strands, maybe a twisted thread or possibly a metallic thread.
On the second needle will be the thread with which you will work the little couching stitches. This may be the same thread and colour as the couched thread, but you may choose to use a contrasting colour. Usually, it will be threaded with a single strand but this will all depend on what you are doing with the couching technique.
Bring the first needle up at the beginning of the circle or line and park it.
Using the second needle, work small stitches over the main thread. Come out of the fabric, take the needle over the couched thread and go back into the same hole you came out of.
It is important that these stitches should not have a tight tension. If you pull too tightly, the couched thread will show kinks and you want it to look like a straight even line. So, when you pull the couching stitch through only pull until the thread is there, no tighter.
And now for the video clip that covers all of the above.
(Don’t forget to click the icon in the bottom right-hand corner to get it to full screen).
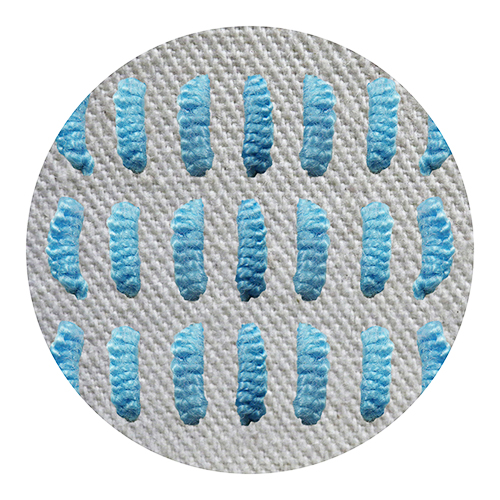
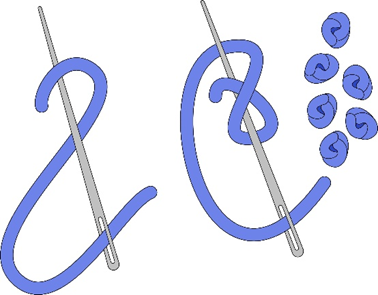
There are a few variations of this stitch in the video clip on this page. They are listed in the table below, in the order is which they appear, with the starting time for each variety in the right-hand column.
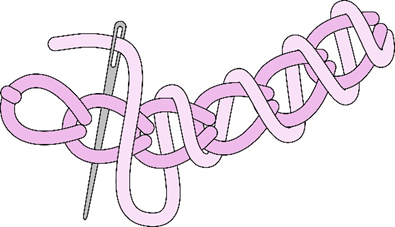
Basic Cast-On Buttonhole Bar
5 seconds
Lazy Daisy Cast-On Buttonhole Bar (single)
1 minute 18 seconds
Lazy Daisy Cast-On Buttonhole Bar (double)
1 minute 43 seconds
In the video clip on the tuition page, the small samples were worked with perle no. 5 thread. If you wish to experiment with the stitch before you work it onto your project, work with similar thread.
With a heat erasable pen, draw 2 parallel horizontal lines placing them about 5 mm apart. Work the buttonhole bars between those lines.
The stitch instructions and diagrams appear below, with the video clip at the bottom of the page. If you would like a printable version, click here.
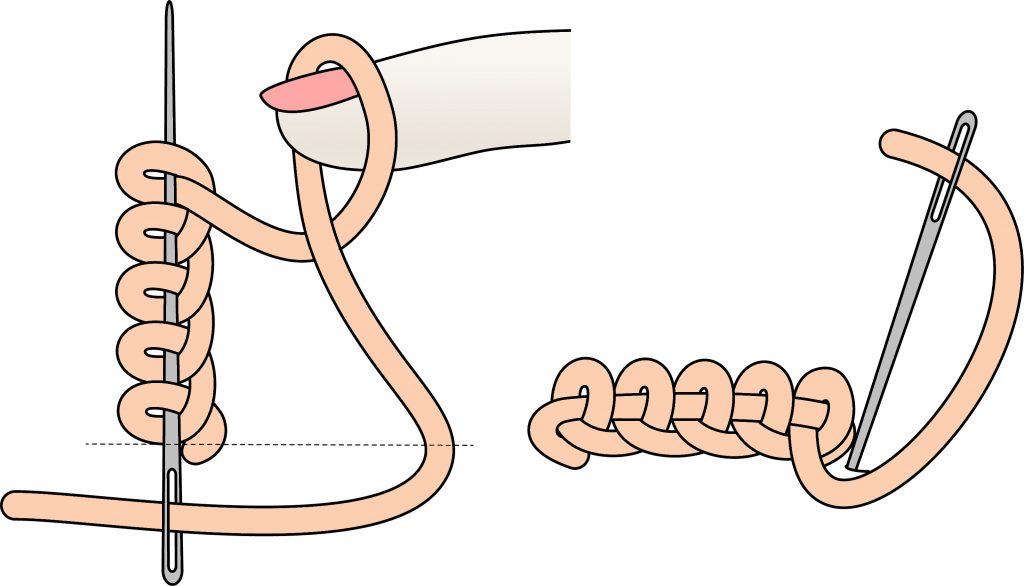
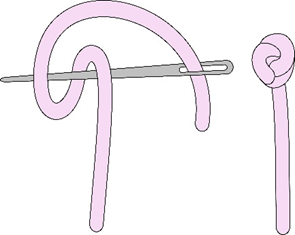
Working the stitch:
Bring the needle up at the beginning of the line.
Take it in at the end of the line and bring it up again at the beginning of the line, making sure you don’t snag the thread and leaving a loop of thread on the top.
The needle should remain in the fabric, facing up.
Twist the thread of the loop over your finger once and place it over needle, pull it to tighten down the needle.
Cast on as many loops as you need to, pull the needle through, tighten the remaining thread of the original loop and go back into the fabric at the end of the line.
Add a tweak with detached chain stitches:
Lazy Daisy Cast-On Buttonhole Bar (single)
Insert a spare needle under the buttonhole bar.
Bring the working needle up through the fabric just below the base of the buttonhole bar. Go back into the same hole coming up just about the tip of the bullion knot.
Guiding the thread under both sides of the spare needle and under the tip of the working needle, pull through.
When you tighten the lazy daisy stitch try to ensure that it lies slightly underneath the buttonhole bar. This will cause it to pop out a bit, making it more pronounced.
Finish the lazy daisy stitch with a small couching stitch that catches the loop, holding it in place.
Lazy Daisy Cast-On Buttonhole Bar (double)
Having worked a single lazy daisy as directed above, remove the spare needle and put it back going under the single lazy daisy as well as the buttonhole bar.
Work a second lazy daisy in the same way, started lower than, and finishing above the first.
And now for the video clip that covers all of the above.
(Don’t forget to click the icon in the bottom right-hand corner to get it to full screen).
There are numerous knots in the video clip on this page. They are listed in the table below, in the order is which they appear, with the starting time for each variety in the right-hand column.
French Knots – single wrap
11 seconds
French Knots – two wraps
33 seconds
Colonial Knots
1 minute 6 seconds
French Knots – multiple wraps
1 minute 51 seconds
Loose French Knot Filler
4 minutes 50 seconds
Extended French Knots (Pistil Stitch)
6 minutes 2 seconds
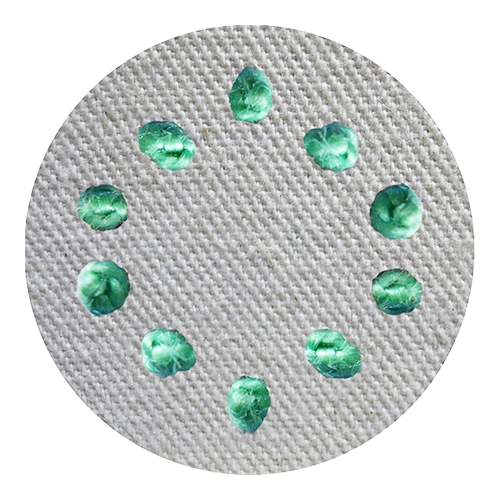
In the video clip on the tuition page, the small samples were worked with perle no. 5 thread on and within circles. If you wish to experiment with the stitch before you work it onto your project, work with similar thread.
The stitch instructions and diagrams appear below, with the video clip at the bottom of the page. If you would like a printable version, click here.
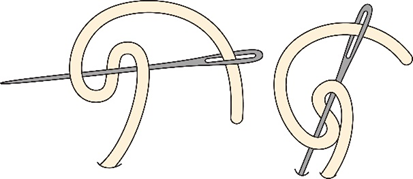
French Knot – single wrap
Bring the needle up through the fabric, twist the thread over the needle once and tighten. Go back into the fabric just next to where you came out. Pull the twist that is around the needle down to the bottom. Hold the thread and pull the needle through to form the knot.
French Knot – two wraps
Bring the needle up through the fabric, twist the thread over the needle once or twice and tighten. Go back into the fabric just next to where you came out. Pull the twists that are around the needle down to the bottom. Hold the thread and pull the needle through to form the knot.
Colonial Knot
There is very little difference in the look of this knot when compared to the French knot. Bring the needle up through the fabric, pick up the thread in a backwards “C” shape. Take the working end of the thread over the needle to the right then under the needle to the left, effectively making a figure 8 with the thread. Go back into the fabric about ½ a millimeter away from where you came out. Pull the twists that are around the needle down to the bottom. Hold the thread and pull the needle through to form the knot.
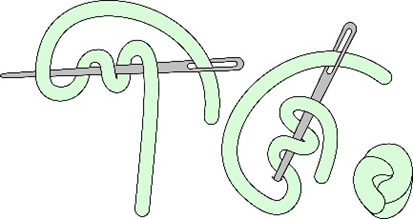
French Knot – Multiple wraps
Bring the needle up through the fabric, twist the thread over the needle up to ten times. Go back into the fabric just next to where you came out, pulling the needle but not all of the thread through. Use the thread that remains on the top of the fabric to tug a few times until all of the loops have tightened into a little ball. Pull the thread through the rest of the way.
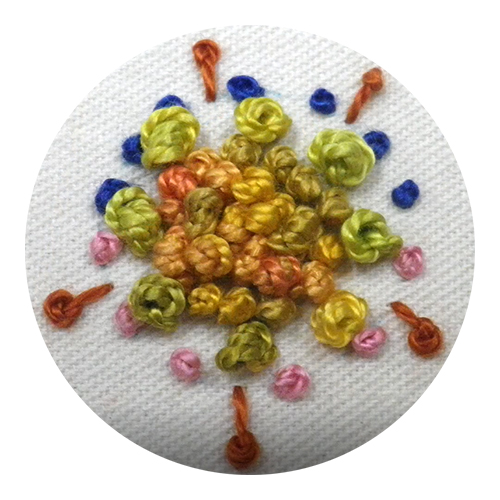
French Knot – loose
Bring the needle up through the fabric, loosely twist the thread over the needle two or three times. Tighten only slightly and go back into the fabric just next to where you came out. Pull the needle through controlling the twists as you do so, the aim being to achieve two or three loose loops of thread held down by the thread that goes into the fabric. Working a bunch of these together to fill an area creates the impression of foliage or flowers seen in the distance.
Extended French Knot (Pistil Stitch)
Bring the needle up through the fabric, twist the thread over the needle once or twice and tighten. Go back into the fabric away from where you came out. Pull the twists that are around the needle down to the bottom. Hold the thread and pull the needle through to form the knot.
And now for the video clip that covers all of the above.
(Don’t forget to click the icon in the bottom right-hand corner to get it to full screen).
There are varieties of detached chain stitch in the video clip on this page. They are listed in the table below, in the order is which they appear, with the starting time for each variety in the right-hand column.
Basic detached chain stitch
3 seconds
Double detached chain stitch
55 seconds
Triple detached chain stitch
2 minutes 49 seconds
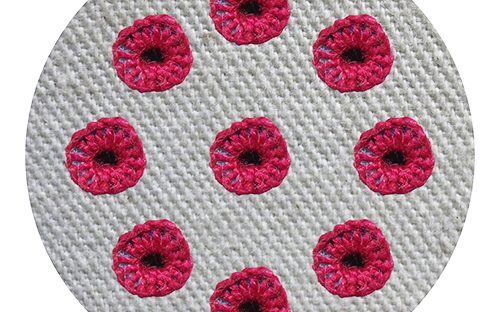
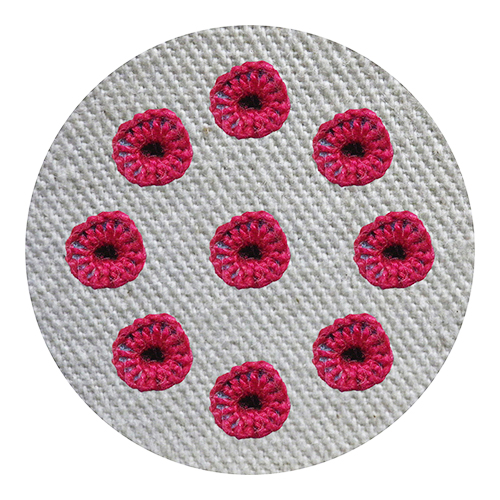
In the video clip on the tuition page, the small samples were worked with perle no. 5 thread around a central French knot. If you want experiment with the stitch before you work it onto your project, work with similar thread.
The stitch instructions and diagrams appear below, with the video clip at the bottom of the page. If you would like a printable version, click here.
Single Detached Chain Stitch (basic)
Bring the needle up at the base of the stitch and pull through. Take the needle back into the same hole and come up again where you want the stitch to end, loop the thread under the needle and pull through. Catch the loop with a small couching stitch.
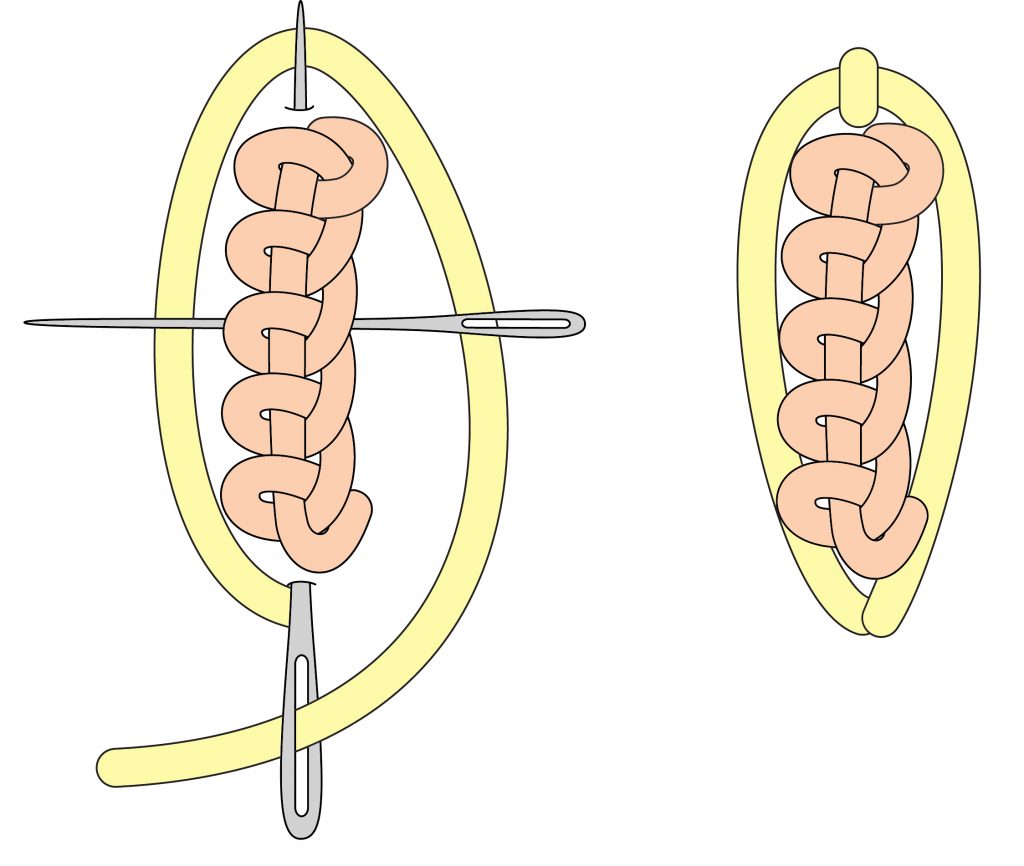
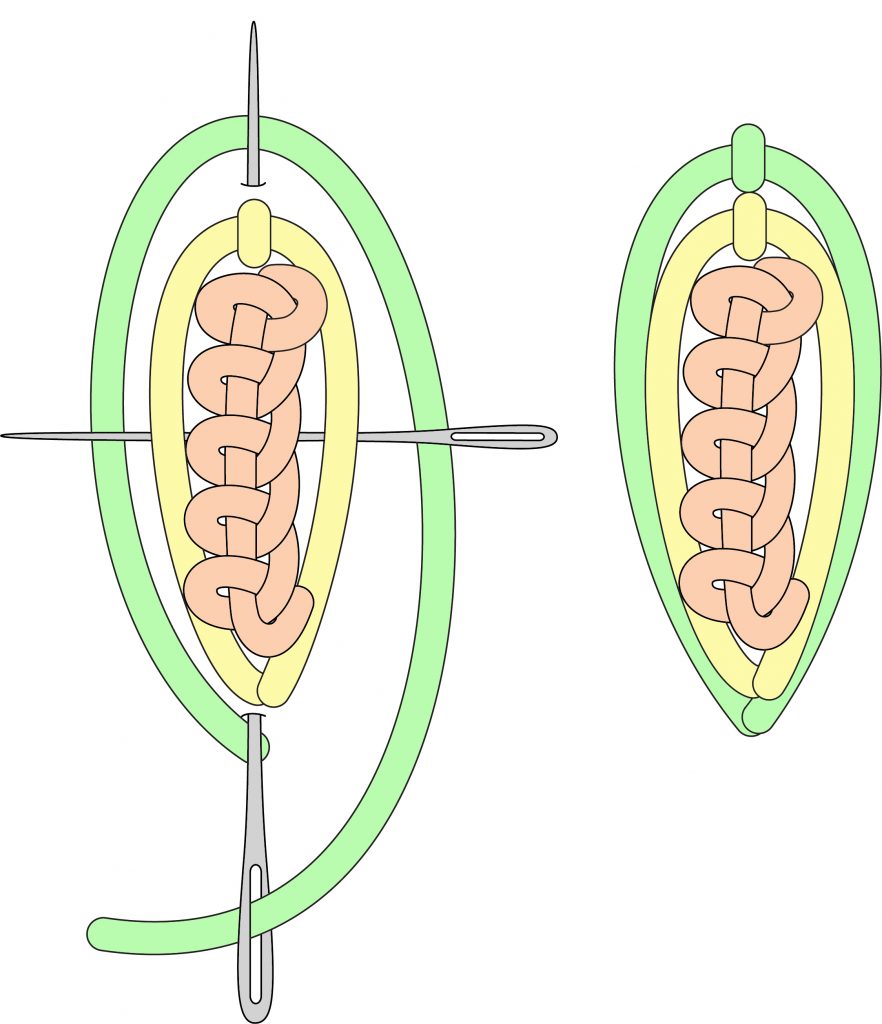
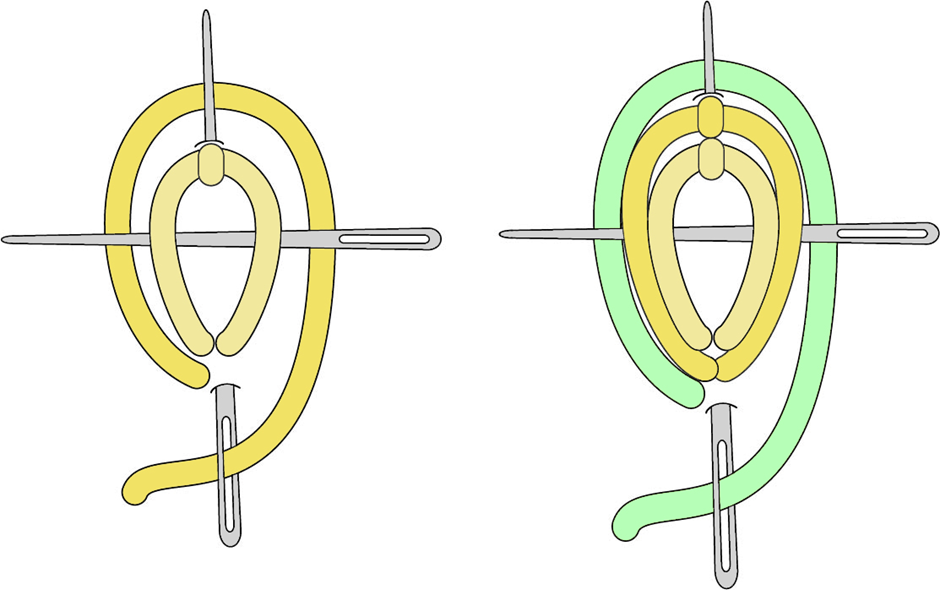
Double and Triple Detached Chain Stitch
When working double and triple detached chain stitches, work the first (single) detached chain stitch by starting a little higher than you would if you were working it on its own.
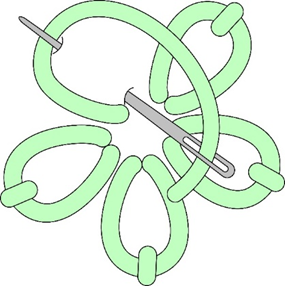
To work the double detached chain stitch, work the first detached chain using the darker thread. Place a tapestry needle under the two sides of the main part of the stitch as indicated in the diagram. Using the lighter thread, came up below the first detached chain. Take the needle back into the same hole and manipulate it so that it comes out where you will want to catch the loop with the small couching stitch. Make the threads of the loop lie under both sides of the horizontal needle and, also, the needle that will catch it. Tighten the stitch, work the small couching stitch to catch the loop and remove the horizontal needle, making sure that the inner detached chain remains slightly raised in the middle.
To work the triple detached chain stitch, work the first two as indicated above. Remove the horizontal tapestry needle that guided the threads of the second stitch. Place it under both stitches that you have worked, as indicated in the illustration on the right, above. Come up below the start of the second stitch, work a detached chain around the second stitch, catching the loop under the horizontal tapestry needle on both sides and again at the top, finishing off with a small couching stitch that catches the loop. Pull reasonably tight so that the stitches in the centre pop up a little bit.
And now for the video clip that covers all of the above.
(Don’t forget to click the icon in the bottom right-hand corner to get it to full screen).
Whilst normally worked with a single strand of stranded cotton or silk, the sample in the video is worked with perle #5 thread, for the sake of clarity. There is a second sample worked with perle #12 thread. Neither of them uses the threads that you would use to work on a project but with these threads, you should be able to see what to do.
In the video clip on the tuition page, the small samples were worked with perle no. 5 thread on straight lines. If you wish to experiment with the stitch before you work it onto your project, work on similar lines with similar thread.
With a heat erasable pen, draw small circles between 5 and 10 mm in diameter.
The stitch instructions and diagrams appear below, with the video clip at the bottom of the page. If you would like a printable version, click here.
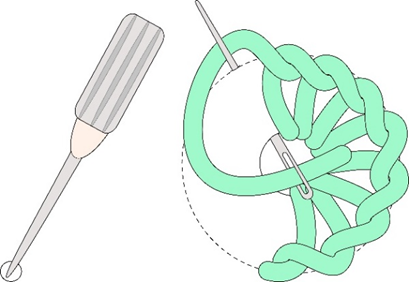
Working the stitch:
In the middle of the circle that you have drawn, pierce the fabric with a tailor’s awl, pushing it all the way down to the handle.
Come up on the line that depicts the outside circle of the eyelet.
Go through the hole that you created with the awl, coming up a little further along the outside line (in either direction), catching the loop of the thread and pulling through to create a buttonhole stitch.
Keep working buttonhole stitches in this way and when you get back to where you started.
Catch the last buttonhole stitch with a small couching stitch.
And now for the video clip that covers all of the above.
(Don’t forget to click the icon in the bottom right-hand corner to get it to full screen).
There are varieties of chain stitch in the video clip on this page. They are listed in the table below, in the order is which they appear, with the starting time for each variety in the right-hand column.
Basic traditional chain stitch
9 seconds
Reverse chain stitch
48 seconds
Chain stitch/backstitch combination
2 minutes 27 seconds
Whipped chain stitch
3 minutes 28 seconds
Whipped chain alternative
4 minutes 2 seconds
Chain stitch circles
5 minutes 37 seconds
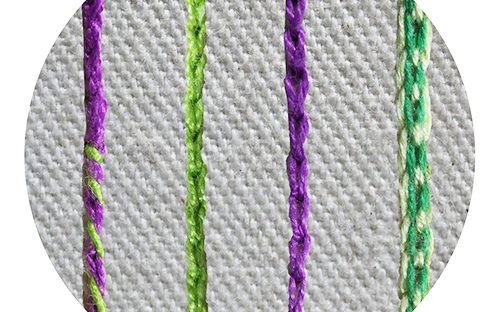
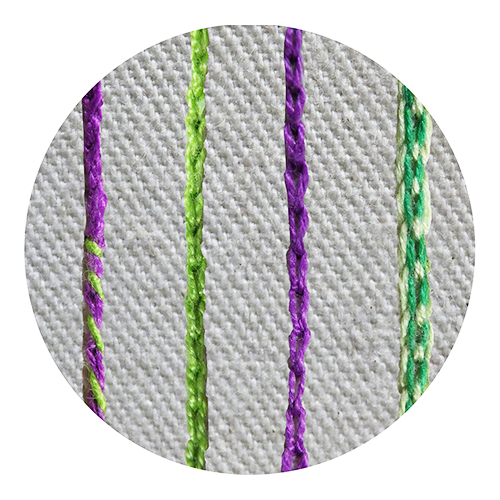
In the video clip on the tuition page, the small samples were worked with perle no. 5 thread on straight lines. If you wish to experiment with the stitch before you work it onto your project, work on similar lines with similar thread.
The stitch instructions and diagrams appear below, with the video clip at the bottom of the page. If you would like a printable version, click here.
With a heat erasable pen, draw 6 parallel lines placing them about 10 mm apart.
Working the stitches:
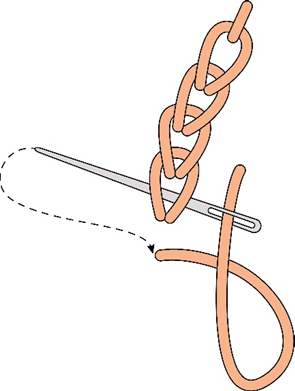
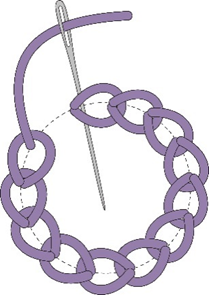
Chain Stitch
Bring the needle up on the line and pull through. Take the needle back into the same hole and come up again where you want the chain stitch to end, loop the thread under the needle and pull through. Staying inside the loop, go back into the same hole, loop the thread under the needle and pull through. Repeat as required and catch the last loop with a small couching stitch.
Chain Stitch – Reverse
Working chain stitch in reverse gives a neater, more controlled result than you will achieve when working it the traditional way. Start with a short straight stitch. Come up on the line slightly further down. Take your needle under the backstitch and go back into same hole. Continue by coming up on the line slightly further down. Take your needle under both threads of the previous loop and go back into same hole. Continue in this way finishing off by just going back into the same hole for the last loop.
Chain Stitch Backstitch Combination
Work a row of chain stitch using shade no. 1. Thereafter, using shade no. 2, work backstitches from the middle of the first chain stitch to the space just before the start of the chain stitch. Follow that with back stitches that start in the middle of the next chain stitch and go into the start of the back stitch in the previous chain stitch. Continue doing backstitch in this way, finishing up on the outside of the last chain stitch. When you do multiple rows of this stitch combination, it is sensible to complete the back stitch in the row before moving onto the next row of chain stitch because it is difficult to see where you should stitch if you have done all of the chain stitch before you start on the backstitch.
Whipped Chain Stitch
To whip chain stitch, bring your needle up adjacent to the beginning of the line of stitching. Take your needle and thread over, then under each stitch. It is advisable to use a tapestry needle when whipping. A contrasting colour thread is often effective.
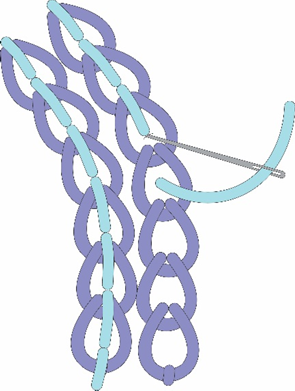
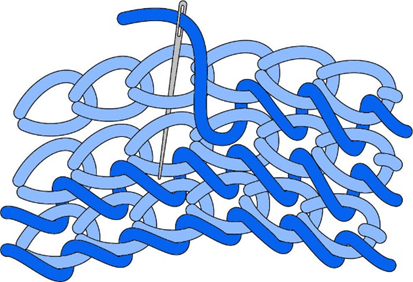
Whipped Chain Stitch Variation
Work a single line of chain stitch. With a separate whipping thread on a tapestry needle, whip up the side of the chain stitch taking in only the outer (bottom) side of the loop. Work a second row of chain stitch next to the first, making sure that the stitches start and end level with the stitches in the first row of chain stitch. Whip the top side of the loop of the first row and the bottom side of the loop of the second row of chain stitch together with the whipping thread. Continue adding rows of chain stitch in this way, whipping before you start the next row. Whip the top side of the last row of chain stitch to complete.
Chain Stitch Circles
Following the instructions for traditional chain stitch above, work even sized stitches on the line. When you get back to where you started, work the last stitch weaving under the start of the first stitch going back into the hole you came out of and ending off your thread.
And now for the video clip that covers all of the above.
(Don’t forget to click the icon in the bottom right-hand corner to get it to full screen).
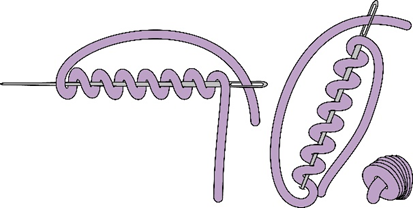
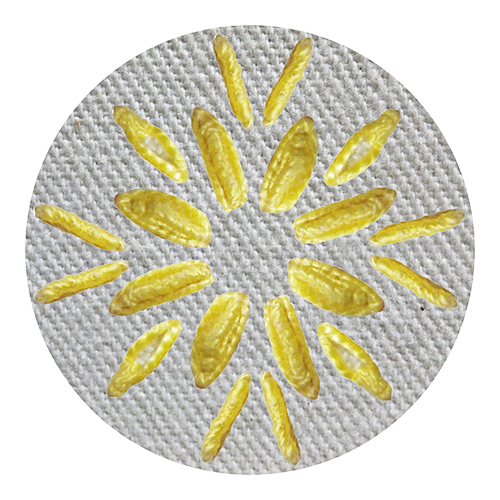
There are a few varieties worked with and around bullion knots in the video clip on this page. They are listed in the table below, in the order is which they appear, with the starting time for each variety in the right-hand column.
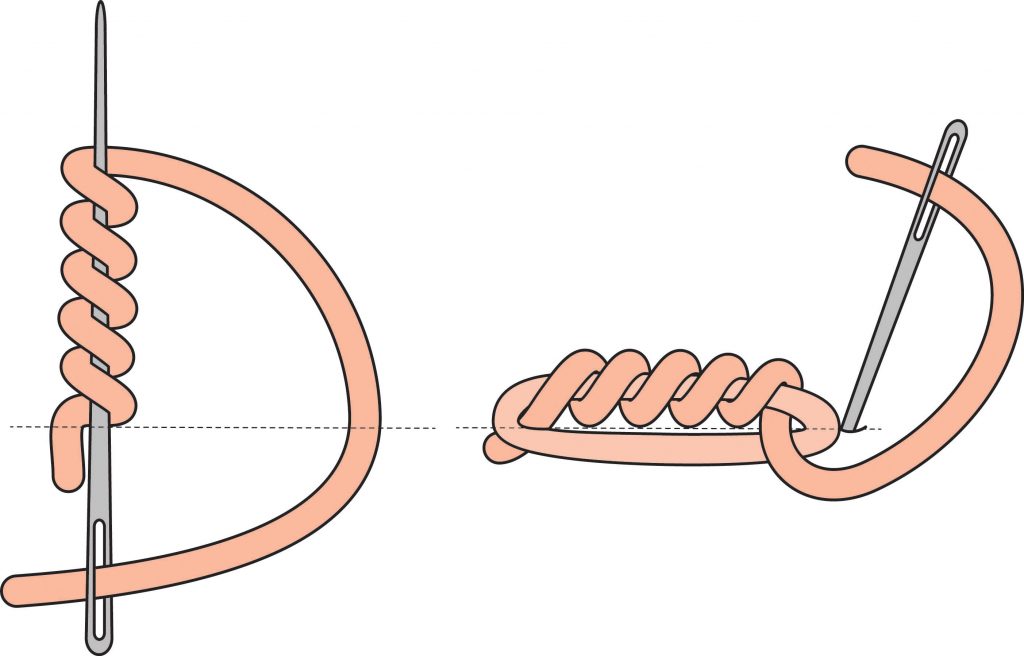
Basic Bullion Knots
4 seconds
Bullion Lazy Daisy
5 minutes 42 seconds
Bullion Lazy Daisy (double)
6 minutes 45 seconds
Lazy Daisy Bullions
10 minutes 33 seconds
Looped Bullion Knots
11 minutes 53 seconds
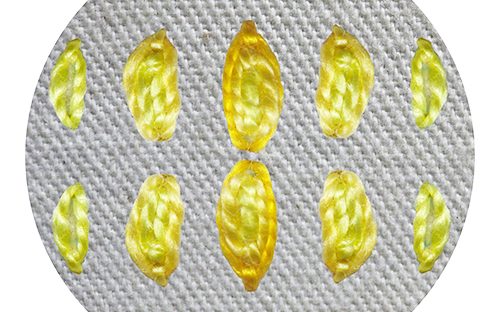
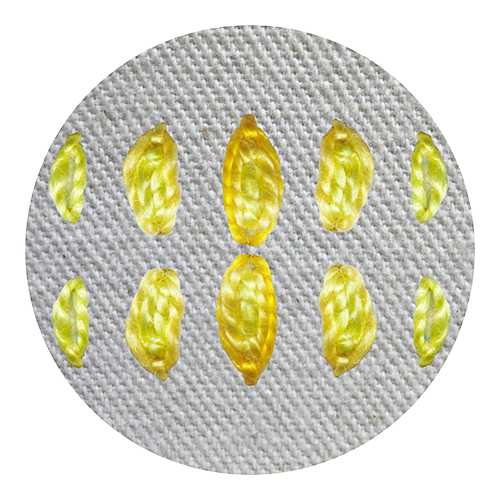
In the video clip on the tuition page, the small samples were worked with perle no. 5 thread on 2 parallel and horizontal straight lines. If you wish to experiment with the stitch before you work it onto your project, work on similar lines with similar thread.
With a heat erasable pen, draw 2 horizontal parallel lines placing them about 10 mm apart.
The stitch instructions and diagrams appear below, with the video clip at the bottom of the page. If you would like a printable version, click here.
Working the knots:
You will note, when watching the video clip, that I work bullion knots in a way that is different to what is usually taught. By doing it my way, it makes it easier for you to work out exactly how many times you need to wrap the needle to fill the space between the two ends of the knot.
Work between the lines, starting on the top line and pulling towards yourself.
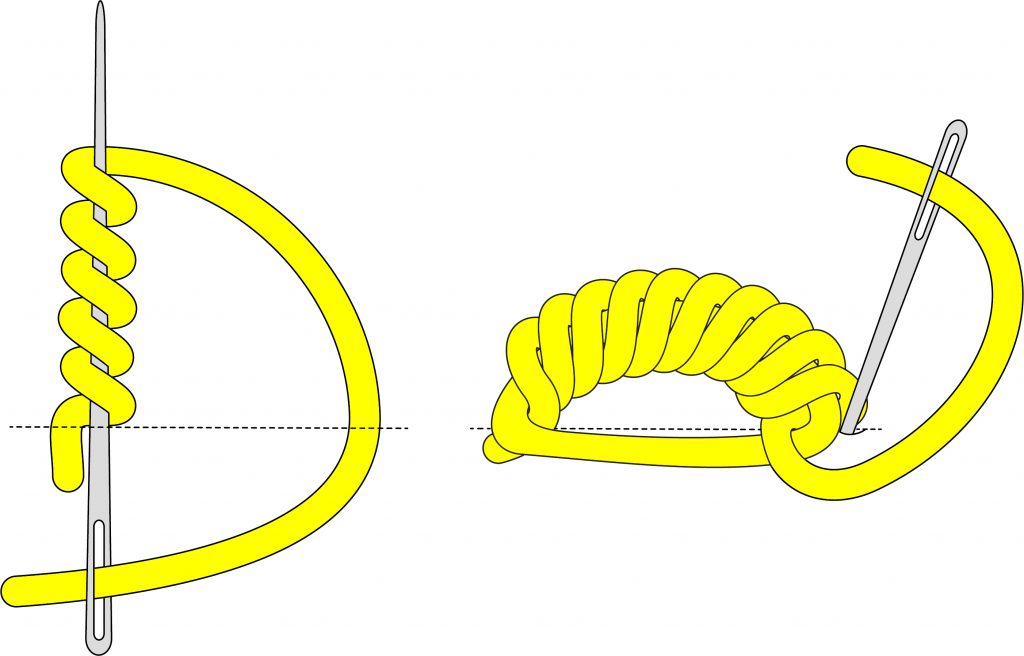
Bullion Knot
Come out of the fabric at the start of the space you wish to fill and go in again at the end of that space. Come out again at the start of the space. Leave a loop of thread on the top and don’t pull the needle all the way through the fabric. Twist the thread around the needle as many times as you require. Holding the twists with the thumb and forefinger of your left hand, pull the needle through. Pull the working thread until the knot lies flat and take the needle back into the fabric at the start of the space.
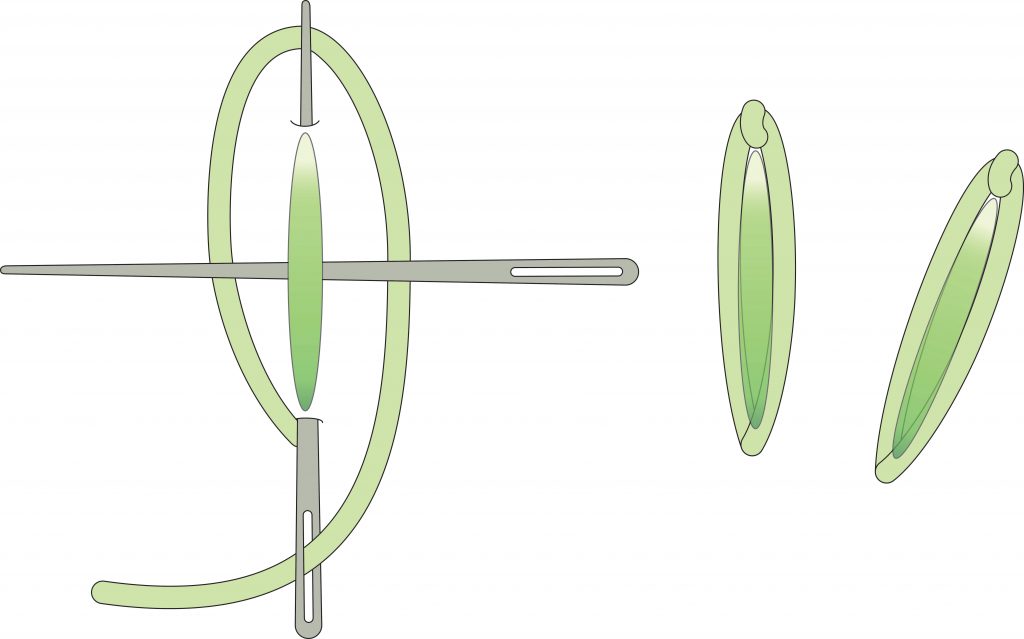
Bullion Lazy Daisy Stitch
Following the guidelines for bullion knots above, work a knot of the required length. Insert a spare needle under the bullion knot as indicated in the diagram above. Bring the working needle up through the fabric just below the base of the bullion knot. Go back into the same hole coming up just about the tip of the bullion knot. Guiding the thread under both sides of the spare needle and under the tip of the working needle, pull through. When you tighten the lazy daisy stitch try to ensure that it lies slightly underneath the bullion knot. This will cause the knot to pop out a bit, making it more pronounced. Finish the lazy daisy stitch with a small couching stitch that catches the loop, holding it in place.
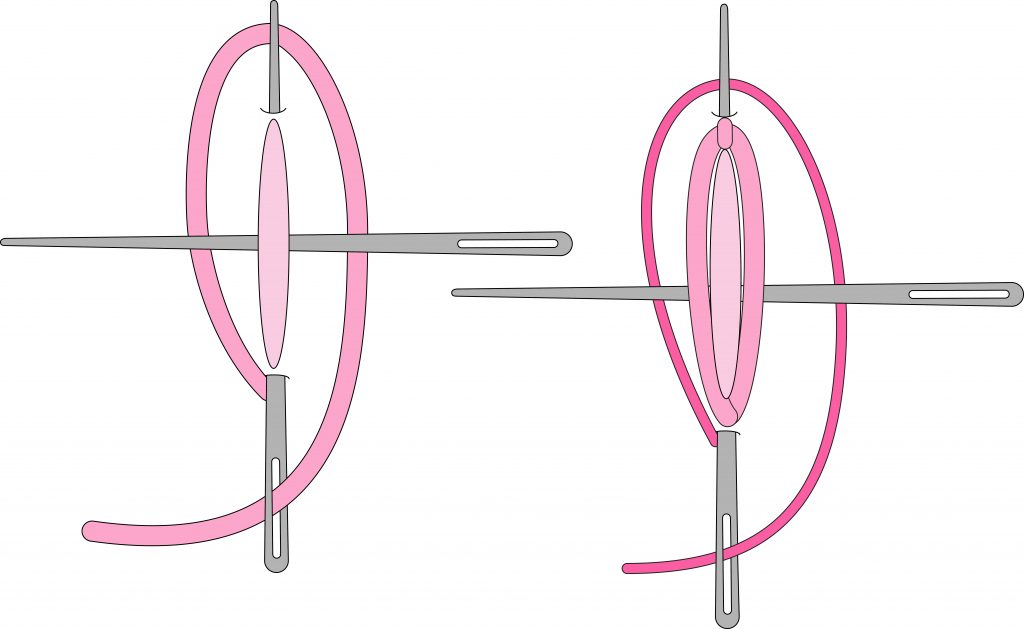
Bullion Lazy Daisy Stitch – double
Following the guidelines for bullion knots above, work a knot of the required length. Insert a spare needle under the bullion knot as indicated in the diagram above. Bring the working needle up through the fabric just below the base of the bullion knot. Go back into the same hole coming up just about the tip of the bullion knot. Guiding the thread under both sides of the spare needle and under the tip of the working needle, pull through. When you tighten the lazy daisy stitch try to ensure that it lies slightly underneath the bullion knot. This will cause the knot to pop out a bit, making it more pronounced. Finish the lazy daisy stitch with a small couching stitch that catches the loop, holding it in place. Work a second lazy daisy stitch around the first one in the same way, tightening it to lie slightly under the first lazy daisy stitch.
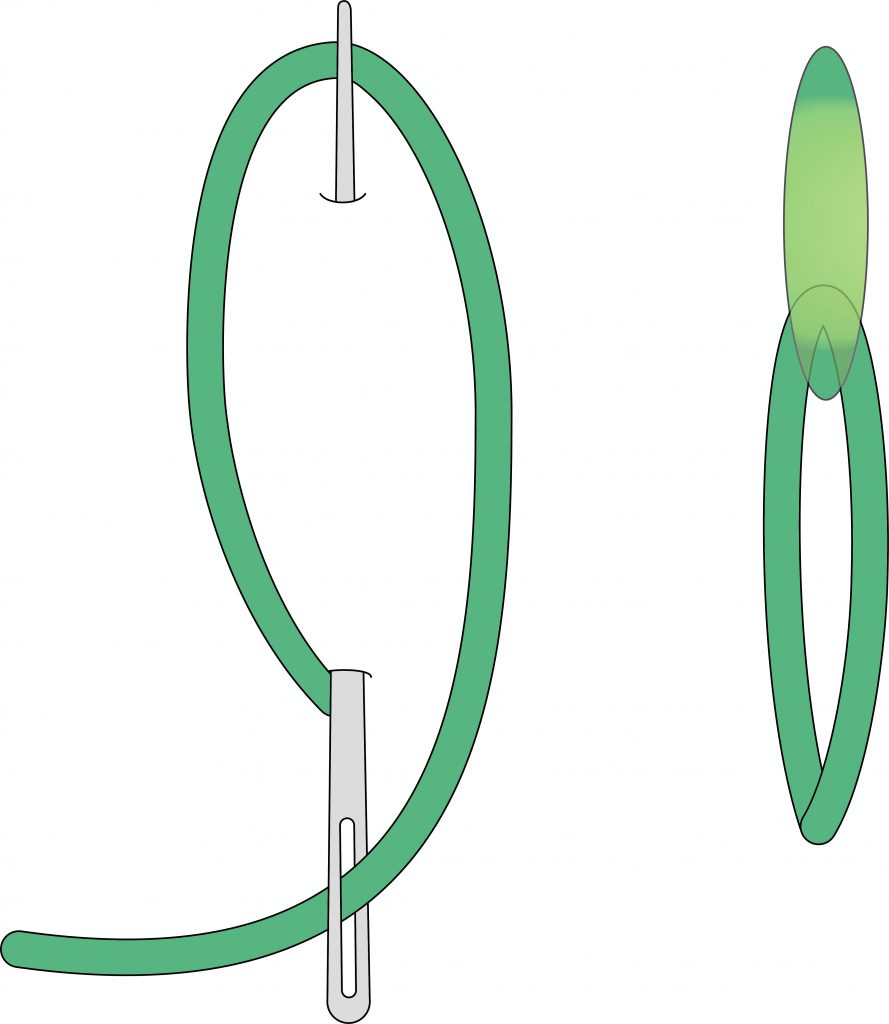
Lazy Daisy Bullions
Bring the needle up at the base of what will be the detached chain stitch. Go back into the same hole and before pulling through, come up at what will be the tip of the detached chain stitch. Pull through. Under normal circumstances, you would finish the stitch with a small couching stitch. Instead, work a bullion knot (usually short, about 4 or 5 wraps).
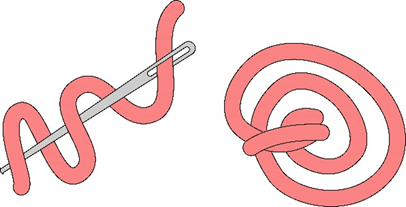
Looped Bullion Knots
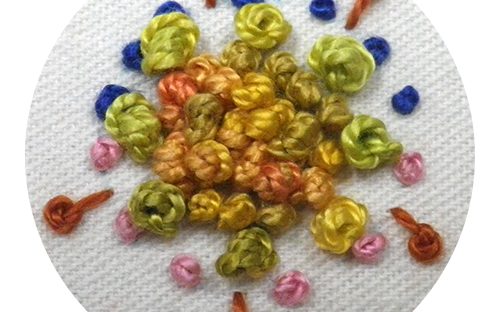
To make a looped bullion knot, do it in the normal way but wrap the thread more times than you need to fill the space available, so that the bullion knot will not lie completely flat but will loop up slightly. These are particularly useful for making bullion roses.
And now for the video clip that covers all of the above.
(Don’t forget to click the icon in the bottom right-hand corner to get it to full screen).